LINDA TRACE DESIGNS

crafty adventures of a makeup loving Japanophile!

.

.

Saturday 24 December 2011

Christmas Wishes

Hello friends,

I just wanted to pop in quickly to wish you a very Merry Christmas.

I realise that for many (if not most) of you, it's still Christmas Eve, but for me, it's the big day :)

I hope your day is filled with the magic, love and light that you all hope for. I hope that, even though you're (no doubt) no longer a child, you can still find something incredible, unbelievable and totally wondrous about this special day :)

If you aren't celebrating Christmas, I still wish you all the good things that SHOULD be associated with this time of year, for those of us who do celebrate it.

I'm no doubt knee-deep in ripped wrapping paper all over the floor and (hopefully) excited, happy children running around me :) Or I've fallen over from drinking too much home-made Sangria after realising we've over extended ourselves with the menu we have planned haha! (not really :))

Here's a little Michael Buble *hubba hubba* magic for you to enjoy before you go :)


or maybe this is more your speed :)


Well that's it for now, I hope you have a wonderful, wonderful day.

Merry Christmas sweet friends.

*hugs*

Linda xx

Mini album for my mother in law

Hello!  Merry Christmas Eve! :)

I was chatting with my friends Chari & Laurel on twitter the other day about the Amy Tangerine Daybooks *adorable* and I was saying how easy it is to make your own mini book, so I did! 

Firstly there are a few step by step photos (it's super simple) and then a quick video for you to see inside it--I haev to apologise for the video, it was my second go at it (trying to keep it short) and I was a bit rambly as it was quite late when I filmed it :) So please ignore the weirdness in my voice and the slight rambliy-ness... 

Here are the photos of putting the actual body of the book together:

First of all just choose your papers--I'm using an old Studio Calico Kit "Into the Woods"--and cut them down to the size you want (I like slightly different sized pages throughout my minis). Score them as you wish (not all of mine were scored in the centre.)

Step 1: gather papers

Get all your papers lined up how you want them. You can see here I have some offset from centre (it gives some interest without adding bulk--it's unexpected :) which is always a good thing!

Step 2: cut and score papers.

Using Bulldog clips (or heavy paperclips), hold all your papers in place, but be sure to keep them folded a bit or the binding will be off (THIS IS IMPORTANT!!)

Step 3: hold papers together

**If you want to machine stitch (which I would reccommend as it's SUPER easy and fast, you wont need to keep your papers folded, you can flatten them out and just stitch up the scoreline. You would also NOT want to use more than maybe 5-6 layers in total as it kills your machine/needle (unless you have an industiral strength one!)**

For 'hand-stitched  binding, do the following:
Using an Awl (a pokey tool) or a paper piercer, carefully poke holes through your scored crease. Be sure to poke right in the centre of the scoreline (not above or below) as it will affect the way the book sits/closes.

Step 4a:

NOT like this: 

Step 4b

Thread a large embroidery sized needle with twine/thread/ribbon and basically, sew the book together. (I started on the outside because I wanted the little knots on the end of the twine to show, i like how they look) I just used a simple straight stitch (in one hole, out the other)  but you could use a blanket stitch or anything you like if you have the time/ability--i have to learn how to do a blanket stitch before I can do that!)

Step 5: Hand stitch the binding

Once finished, put some heavy paperclips on all sides of your book (or just put something heavy on top of it) to really help it to stay creased and 'closed'.  It will still pop open a little because the seam is so small, but this helps.

Step 6: use weight/clips to hold book together

That's it!! The next step is to embellish :) I just stuck wtih what was in my SC kit and added one or two extra things I had lying around. Made is much quicker.

Here is the video showing you the inside: 


OK Well I hear my 2 year old is awake so I'd better go get her!

Hope you like :)

Thanks so much for stopping by and I'll see you again soon

*hugs*

Linda

Tuesday 20 December 2011

December Daily days 8-17

Hi!

I'm going to cut straight to the chase today--lots of December Daily photos to share, so let's get to it!

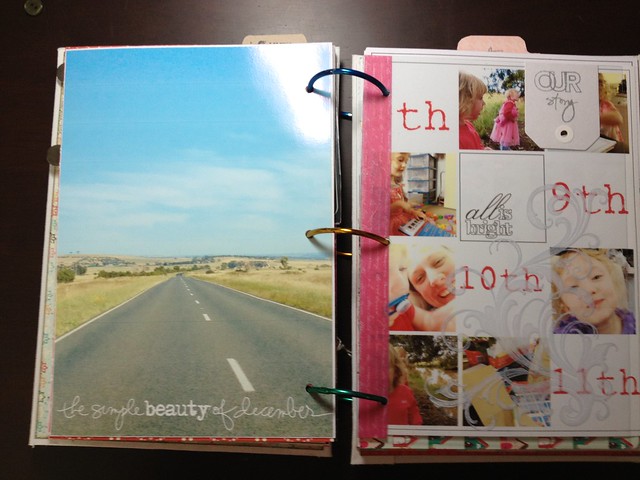
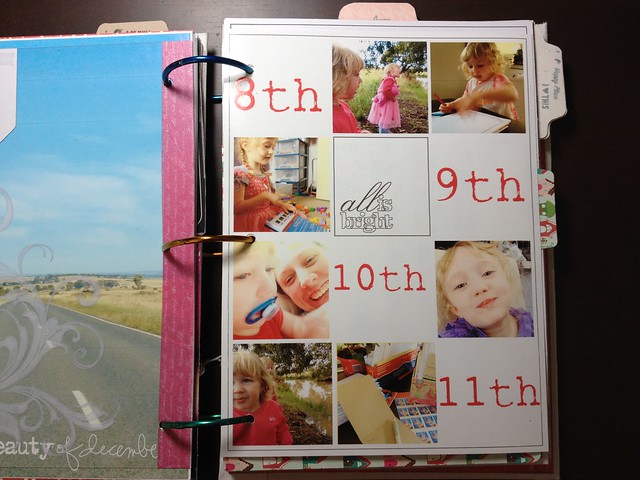
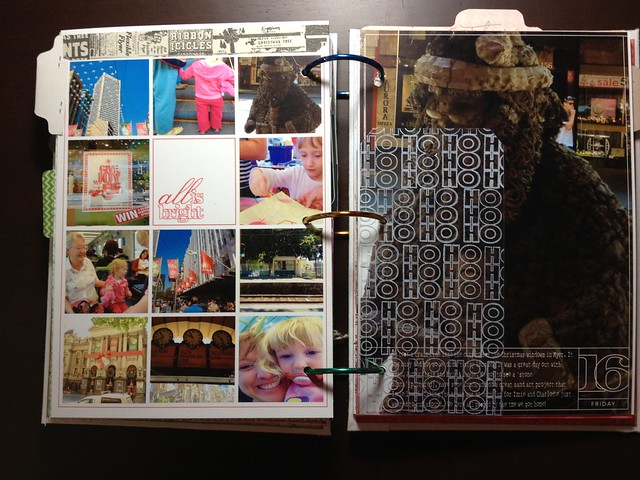
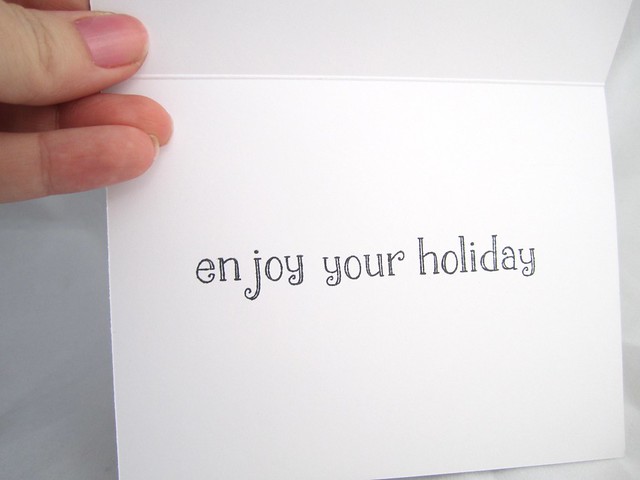
December 8-11 went by really fast and busily, but nothing seemed noteworthy or very christmassy (apart from doing Christmas cards) so I decided to make a collage of the several days compiled into one page.

IMG_0695

The photo on the left I shared with you last time, it's a photo of the drive to my hubby's work (and is quite close to our home). I'm finding this landscape is really calling to me lately. I want to live with this kind of view outside every window in my home (except the road lol)
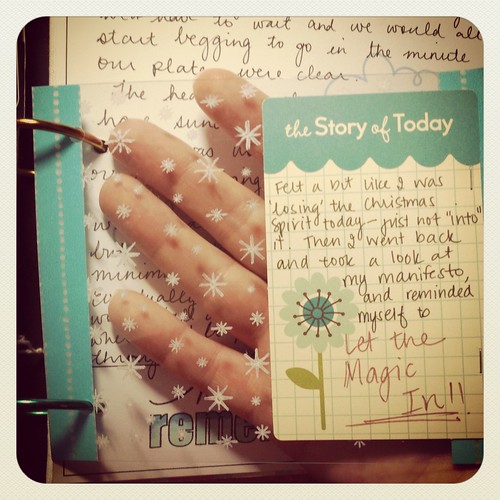
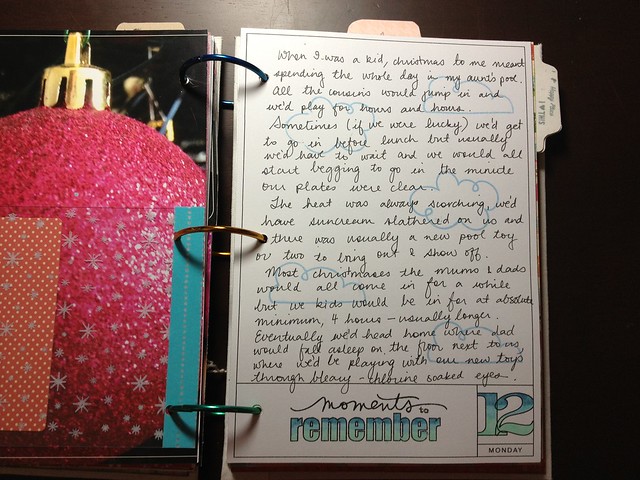
4 day collage

Day 12 

December 12

So you can see the insert page 

Day 12 insert

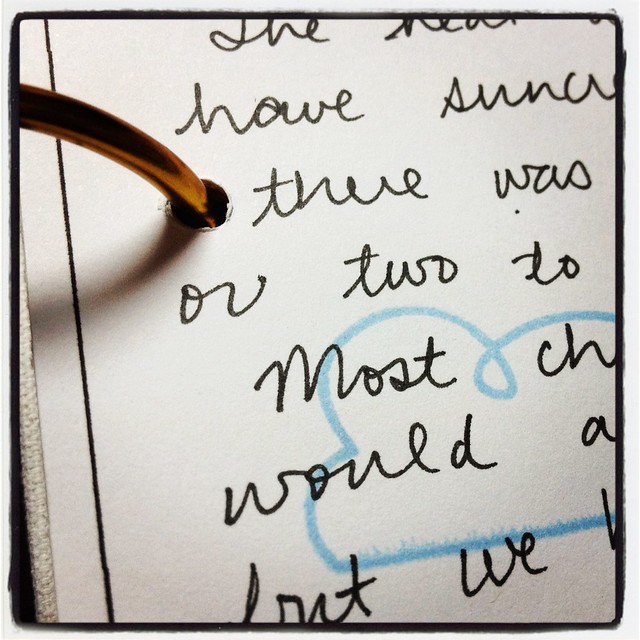
This page's journalling is all about my memories as a child swimming the WHOLE day on Christmas day.

December 12 closeup_journalling

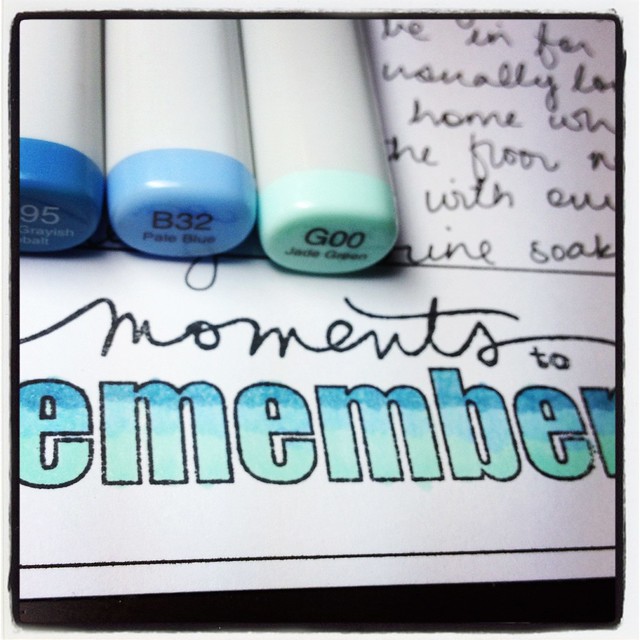
I wanted the stamped word at the bottom of the page reflect what was written, so I coloured it in with three blue copic markers, in gradually darkening shades, to replicate the look of a pool (given that I was talking about swimming in a pool).  I'm SO happy with how this turned out :)

IMG_0710

I felt the full page of handwritten journalling was a bit bare, so I added some Lawn Fawn cloud stamps using Jenny Bowlin ink. I think it's the perfect finishing touch as all my memories of Christmas are of blue skies. 

day 12 _more stamping

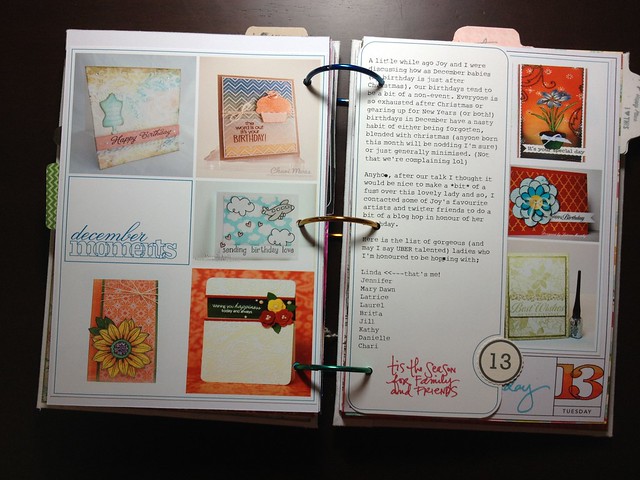
As I'm sure all of you remember, December 13th was Joy Taylor's birthday, so I decided to include that in my December Daily (given that I started organising the blog hop in about October I felt it deserved a page LOL!)

I did a collage using Ali Edwards templates, of all the cards that the wonderful ladies who hopped along with me, made for Joy.

Dec 13th

I used an AE long Journaller, added a text box then basically cut and paste the writing I'd had here on my blog as the first stop of the Blog Hop (which introduced it, explained what was happening etc) I think it's so perfect. I'll be doing this again. I love how it's half size in comparison to the other pages and you can see the other cards peeking out from behind it. :)

Long Journaller Dec 13th

Some stamping to finish off the page :)

Dec 13th right hand page

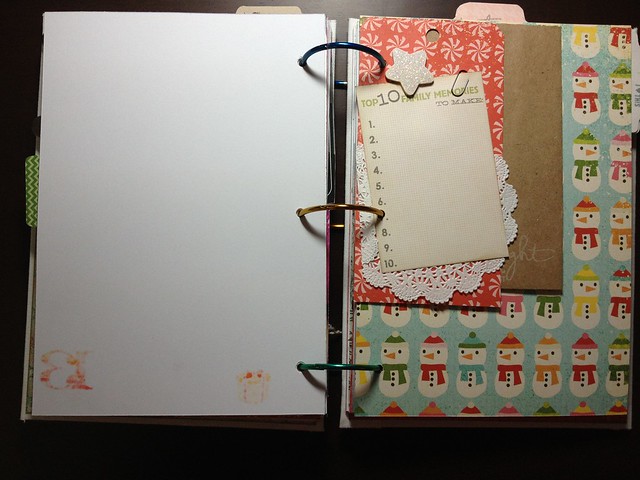
this next page is currently a 'free page'.  I'll be adding journalling to the little 'Memories'  tag, as the month progresses, but as it's about favourites, I wanted to wait till close to the end so I can think back and choose my faves. The page on the left (where you can see the copic marker's bled through) doesn't bother me at. all.  I may cover it over, i may not. I think it gives a much needed rest to the eyes!

Free page

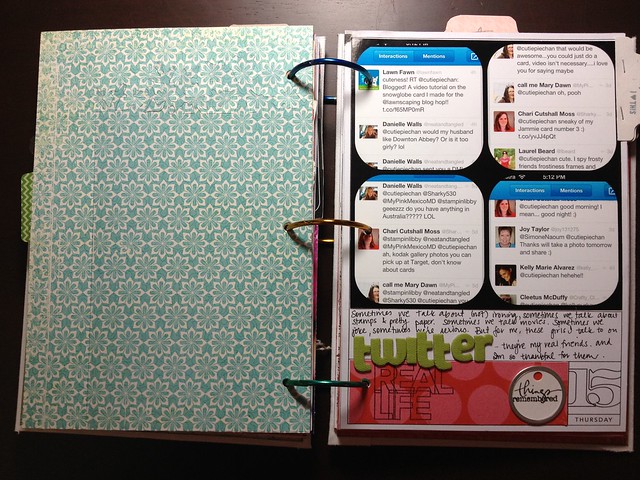
This next page might seem a bit strange to some, but it's important to me that I put it in.  I never. NEVER IN A MILLION YEARS thought I would get into Twitter. I totally didn't see the point, thought it was ridiculous. Now....I love it. And I've made some really gorgeous friends on there (you girls know who you are :)) so I wanted to capture that. it's such an important part of my day now, chatting with these girls throughout the day, that I wanted it in my album.
Day 15

I just used the Diptick and Instagram applications on my iPhone and then took a few screen shots of some recent convos we'd had in the past few weeks. I love this page.

the journalling reads:
"Sometimes we talk about (not) ironing, sometimes we talk about stamps and pretty paper. Sometimes we talk movies, sometimes we joke and sometimes we're serious. But for me, these girls I talk to on TWITTER, they're my real friends. And I'm so thankful for them."

I am. I really am so thankful :) They make being a stay at home mum a little bit less stir-crazy inducing. They get me. They speak like adults (not like a 2 and 4 year old :) and help me keep my sanity!) I treasure them!

Dec 16th

Dec 16th

Another collage. We went into the city to see the Christmas display all the big department stores put up (which, incidentally were a BUST), but we had a really nice day. The collage is just some of my favourite shots.

Right hand page:

Dec 16th closeup

showing a street performer who was being a Santa Rock Statue. he was so amazing to look at.

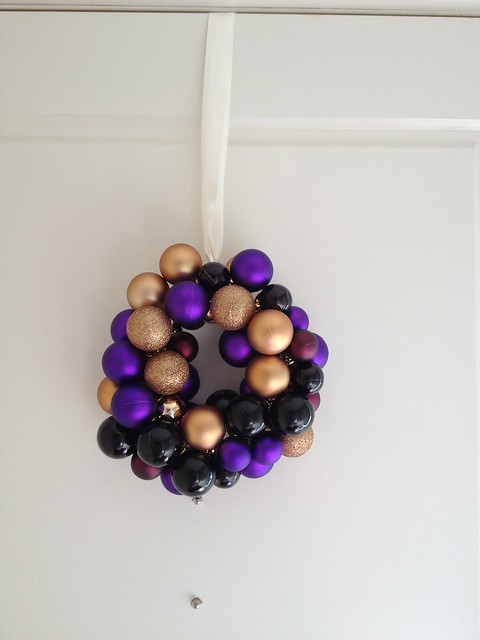
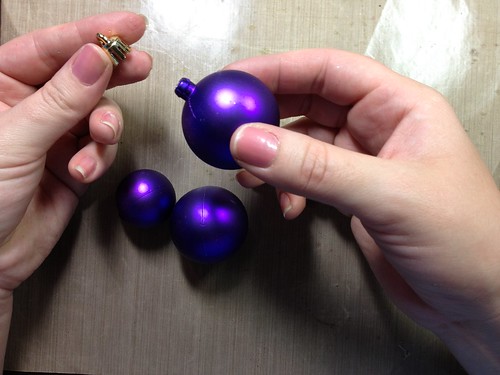
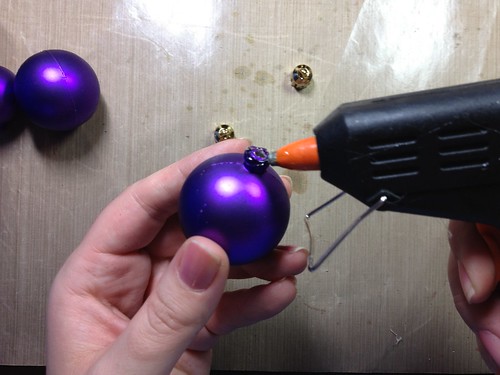
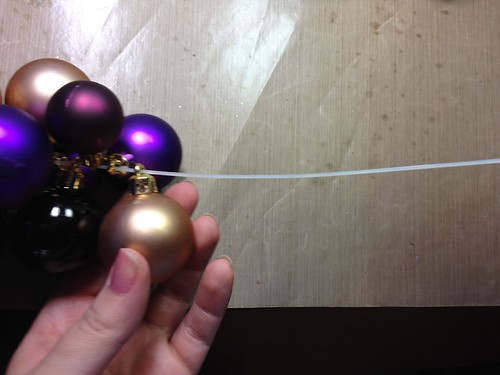
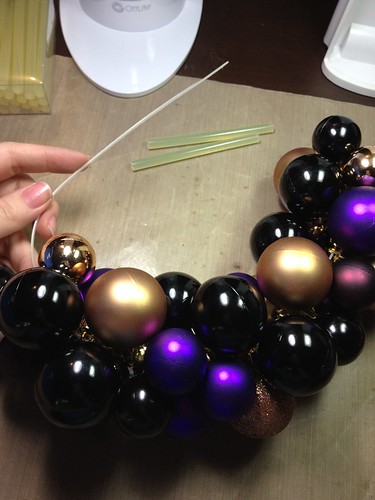
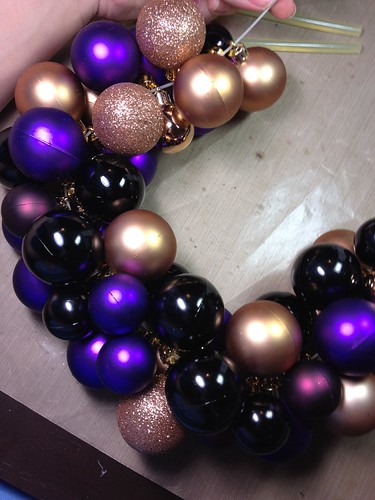
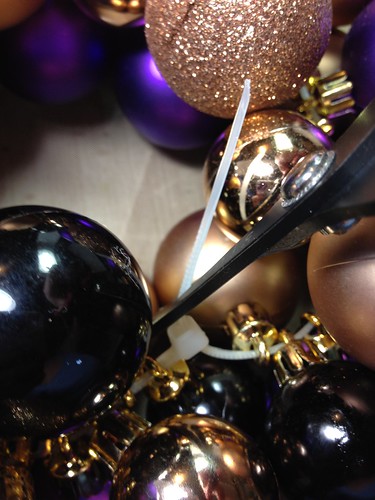
December 17th was when I helped out Mary Dawn with my Bauble wreath tutorial. I thought it was fitting (the spirit of Christmas IS all about goodwill towards others right?!)

Dec 17th

PHEW!!!  That's it!

I'll be back soon with more photos and pages :)

Hope you liked!!

Speak to you soon

*hugs*

Linda xx

Sunday 18 December 2011

Sending you Love Ruffled Flower

Hi!

First of all, I wanted to let you know I will be back soon with another update of my December Daily, I'm finding it much easier to take photgraphs and post about several days at once rather than a small amount every day. It's been a bit busy lately (as I'm sure it is for everyone), but I'm JUST managing to keep afloat in this project!

Secondly I want to thank you all so much for all the sweet, encouraging and downright FANTASTIC comments you've been leaving me lately. it's so so exciting for me to see the words you've taken time out of your day to write and to encourage me so much. It just makes my heart swell. Thank you.

Thirdly, please pop over to THIS blog, where a lovely lady named Stacy did a really gorgeous take on my Bunny Snowglobe card that I did for the Lawnscaping blog hop. She's only a beginner (so she says) but wow does she have a gift!

OK on to the card!

I wanted to play around with my distress stains a bit so I made this:

Sending you Love Ruffled Flower

Something nice and bright and summery to suit the season here (although it's been quite cold some days! Typical crazy Melbourne weather).

Using a technique I've seen Jennifer McGuire use many times, I added a few sprays of Pearlised water (basically just a few scoops of perfect pearl powder in water, which is spritzed using a mini mister or similar)

Here you can see the shine: 

closeup_ruffled flower

It's hard to catch in a photo, but all those flecks that look a little bit white?! They're shine :) So so pretty.

Well I hope you liked it!
Here are the products I used:


Thanks so much for looking!

Take care and I'll talk to you soon

*hugs*

Linda xx

Saturday 17 December 2011

Guest post for My Pink Mexico

Hi everyone!

A good friend of mine Mary Dawn has been hosting a 12 15 days of Christmas crafts over on her fabulous blog.

Unfortunately, a medical issue has arisen and put her in a bit of a bind, so she's asked me to help out! Of course I jumped at the chance!

Now there has been a Christmas craft I've been meaning to do for AGES but just never gotten around to, so this was my chance.

A bauble door wreath.

Each year I like to make a different wreath and this year is no different!

Here are photos to show you how I did it (it's SUPER simple!)

Door bauble Wreath

Step 1: Remove the cap from  your bauble (if you can)

Step 1

Step 2: Use hot-glue gun to add glue to the 'neck' of the bauble

Step 2

Step 3: Replace the cap (the hot glue will ensure the bauble will stay on when strung up :))

Step 3

Step 4: String your baubles along your wire/tie

Normally you would use a wire coat hanger, untwist it and form it into a circle shape, however I couldn't find any wire coat hangers ANYWHERE lately!! So I had to be inventive :)
I found some cable ties that I thought would do the trick as they're stiff enough to hold the circular shape.

Step 4

Step 4_b: 

Step 4_b


Step 5: Keep going! 

Step 5

Step 6

Look at all that glitter and gleam :)

Step 7: Twist your coat hanger back together at the ends/seal your cable tie

Cut off excess tie 'tail' if there is any.

Step 7

Step 8: I added some thick satin ribbon to give a 'tail' look, but a big bow up the top would look sweet too. You could string it up using fishing wire (or similar) but I just used my ribbon for this photo.

Door bauble Wreath


That's it!! Super easy and effective. I'll definitely be making another of these with larger baubles.

One note though: you'll need a LOT of baubles. This wreath is small (only about 9 inches in diameter and used around 50 smaller baubles.

Another fun option if you were using a cable tie/thick string like I did, would be just to make a long string of baubles to hang from your ceiling. (Like a banner)

I hope you enjoyed!!

If you have any questions or comments, let me know!

Speak to you all soon thanks so much for stopping by!

*hugs*

Linda xx

Thursday 15 December 2011

Florida Snowmen

**this is my second post for today. for the first, go HERE**

Yep, I'm back with another kooky snowman card...there will be more too, I can't help myself lol

This card is dedicated to my gorgeous friend Laurel, who was having a bad day and a sneek peek of this really made her laugh out loud--guess I know which christmas card to send her now! heehee

So here it is:

Heading South Snowmen

LOL. i can't stop laughing at them.

So i stamped the snowmen (and women :)) and then added some copic oclouring for shading and the noses. I then paper pieces the bathing suits/floaty. 

My 4 year old daughter Izzie saw the cut out bikini top and said "oh look mummy, these look like sunglasses!" and she put them on the snowman's face. *facepalm* BRILLIANT!!! So I immediately pulled out some acetate, stamped the bikini onto it using Staz on, then on the back of the acetate I coloured in using a brown Copic Marker so the glasses looked like sunglasses (they were tinted I mean).

Next I just cut a white piceee of cardstock with a curve, to make the snowbank and added a line of stickles. Then I added some snowflakes using white PTI ink and added the setniment to the bottom (which is clearly a shortened version of "heading south for the winter"--hope that makes sense!)

Finally I just adhered it all together, matted the main piece and then put it onto a piece of scored Mocha layering paper!

On the inside it says:

Heading South Snowmen_inside

Here are the products I used:


Well that's it for me today!

Thanks so much for stoppign by!

See you soon

*hugs*

Linda xx