LINDA TRACE DESIGNS

crafty adventures of a makeup loving Japanophile!

.

.

Saturday 27 July 2013

2 more cards for the OCC Summer Card Camp 2!

hi!

I'm back with another 2 cards inspired by the current Online Card Class Summer Camp 2!


The first one uses the same colour scheme as before (from week one) with the new Neat and Tangled Splotches stamp :)


 HEY_splotches_occ_summercamp2
 I loved the idea of diecutting the letters, so I used the Lawn Fawn Quinn's ABC's dies :)

My second card is using one of the additional colour combos offered in Day 5 of week 3, as well as the week three sketch :)


star_awesome day_OCC_summercamp2 

 First I stamped the background with the Impression Obsession zebra-print stamp (love this!) and then I diecut the star.  I made it gold by stamping the Delicata Gold ink pad onto it directly. I hit it wtih my heat tool to make it dry a bit faster (impatient!).

For the ribbon/twine part of the sketch, I thought it would be fun to use the Simon Says Stamp Envelope Sentiments set, and partially-ink it up several times to make it look longer (and like there were three strands of twine, not just the one in the stamp :))

The banner is cut from neenah white cardstock that I inked with red chalk ink and then stamped the sentiment with Versafine ink :)

Lastly I added some pearls that I copic-coloured red to match the banner.

Hope you like!

I'll be back with more soon :)

*crafty hugs*

Linda


Summer Card Camp 2 cards!

Hello!

I thought I'd share a couple of cards I've made for the Online Card Classes Summer Card Camp 2!


There are sketches and colour combos to be used for each week of the Camp, and I chose to use both a sketch AND a colour combo--something that generally frightens the bejeesus outta me :)


Anyway, here they are!


just becase_OCC_summer2
 I masked off the bottom section of the card, and stamped the floral image using white colorbox ink, then re-stamped just slightly offset, using various Hero Arts shadow inks--I love this shadow-stamping effect!

The banner is just heat embossed in white on vellum :)  You could easily dress this card up even more, but I like the simplicity.

OK the next card:

CONGRATULATIONS_angled_OCC_Summer2


Using the same sketch (as I'm sure you can tell), I stamped the Impression Obsession Herringbone image and then added some strips for the colour requirements. The strips I made just swiping Hero ARts shadow ink directly onto cardstock, then trimming it to size.

The little stars are from a Hero Arts set and I fussy cut them, then added a little stickles :)

I think you could duplicate this card in lots of different ways, make it more feminine, or more masculine. (I think this is still good for a guy card though :))

Hope you like!

I'll be back soon with more :)

Linda x


Saturday 20 July 2013

Pinterest inspired

Hi!

Lately I haven't had much time to craft and to be honest, with this ever-growing bump I'm carting around, I haven't had much desire to stand up for long periods of time either :)

So when I come into my craft room, I like to have some mojo or inspiration ready to go, so I can craft quickly and with purpose, rather than fiddling around, or worse, not getting anywhere.

Pinterest is my go-to mojo-booster. Its fast, you can search by colour or shape or style (if you have something in mind) and its a fantastic way to get an image in your mind, to help you bring it to life as a card or crafty project.


Recently I shared a layout with you which inspired by this image from Pinterest:


Here is the layout,


I created this layout using Faber Castell Gelatos as watercolours.


So today, I thought I'd share a card I made with you, inspired by another image from Pinterest.


Here is the inspo piece:


I loved the simplicity of it, the soft, feminine colours and the shape of the circle in the centre caught my eye, as I've been using the latest release stamps from Neat and Tangled (Everyday Circles and Scrap Circles) a lot lately.

Here is my card:
Watercoloured flowers


Now I am absolutely NO WAY a watercolour artist, but I'm really having fun learning new techniques and trying to improve. 

I highly recommend you watch Angela Fehr on You Tube, she manages to impart a HUGE number of informative tips and tricks as she fluidly fills her page with seriously beautiful images. You can also check out her blog here http://angelafehr.com/ I could watch her ALL DAY LONG.

To paint these flowers, I used Hero Arts Shadow Inks in Fresh Peach, Green Hills and Field Greens. I simply stamped the ink pads directly onto my craft sheet, and using a wet watercolouring brush, I set to work.

To add a little added 'something' to the leaves, I second-generation stamped the little leaves from the Fresh Blooms Neat and Tangled stamp set, over the top of a few of my hand-painted leaves (not all of them). I love the soft colours of this card!

I look forward to learning more and more about water-colouring and hopefully bringing you better and better projects!

What do you do for inspiration? Are you on Pinterest? I'd love to know :)


Thanks so much for stopping by! I'll see you again tomorrow for my Neat and Tangled monthly post!


Linda :)


Tuesday 16 July 2013

New challenge at ABNH!


Hello!

We're back with a new challenge over at ABNH, so I thought I'd share the card I made!


Now I gotta admit, these ladies (and all the HA artists) inspire me EVERY time they make a card/project, so choosing just one was difficult.

But I chose Jennifer McGuire. Seriously, EVERY SINGLE ONE of her cards makes me slap my forehead and say to myself 'why can't I have thought of that?!' She's just genius.

And one of the nicest people on the planet. Maybe THE nicest :) I adore her.


OK! So I basically roamed around on Jennifer's blog and got 'the vibe', then set about making my card. Super simple, let the stamps 'sing'. Love.


I hope you'll head over to ABNH with me now to check out the rest of the DT's projects!  Don't forget there is a prize up for grabs thanks to our super generous sponsors!


Talk to you all soon!

Linda xoox

Saturday 13 July 2013

Neat and Tangled July Release: Scrap Circles

Hello there!

I'm excited to be here today, for the


This set is very graphic and simple, I really love it. I wanted to think outside the box a little and use the circular images for more than just circles.

I've been feeling the need to get messy and art journal lately, so I went with that.  I used my beloved new Gelatos :)

Here's what I came up with.


art journal


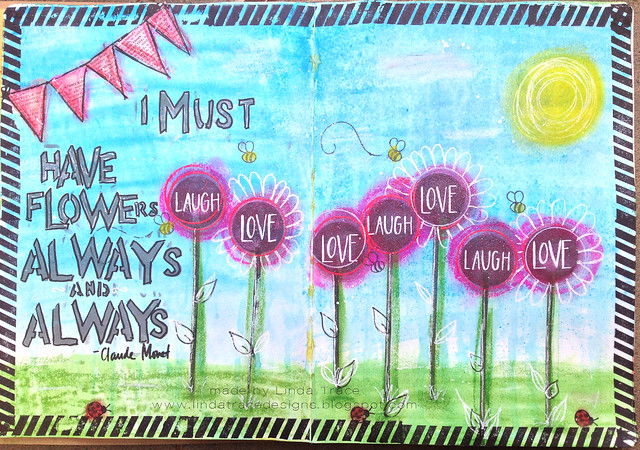
I thought I'd show you the steps I took to achieve the finished page.

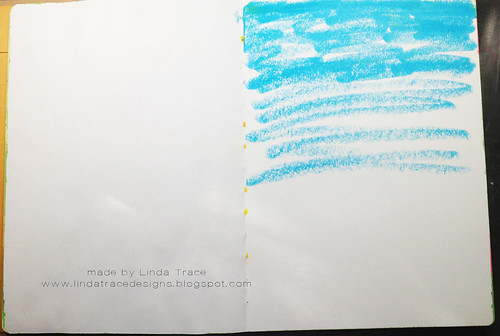
For the sky, scribble some gelato blue on the page. Try to get the top thicker/more fully covered than the middle/bottom. This will allow for some good fading.
progress1


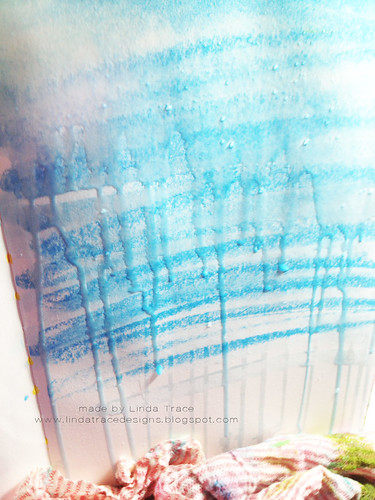
Spray the very top of the page with water from a mister bottle and let it run.

I heat set it a little as I went, then moved down the page, misted a bit more, let it run etc (repeat repeat)

If I needed to, I went back in an added more blue gelato to fill out the colour.
progress2

I wanted the pages to look a little different, so while the right-hand page was still quite wet, I closed my journal and pressed down, to transfer the colour onto the blank left-hand page.  This made the left page slightly paler, but not so much that it looks like an error.

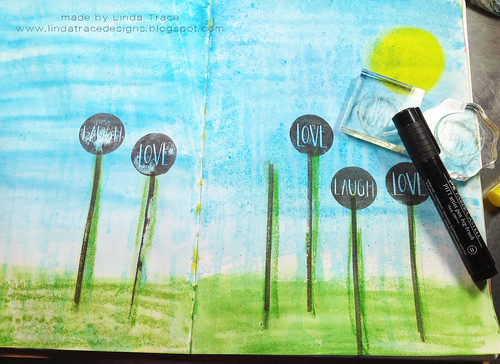
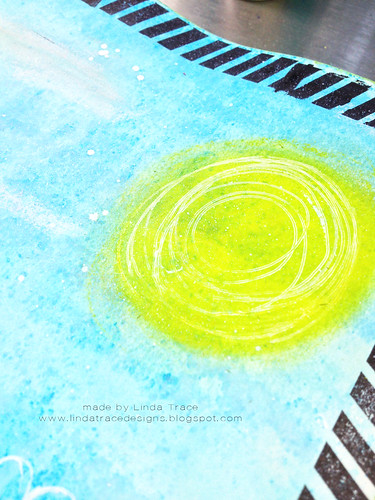
Next I made a sun just by using a yellow Gelato, I scribbled a circle, then used my finger to smear the colour and smooth it out. I kept adding layers till I was happy.

I created the grass in the same way I did the sky. (Scribble and spritz :) I did a bit more smoothing with my fingers this time to give it a different texture to the sky.

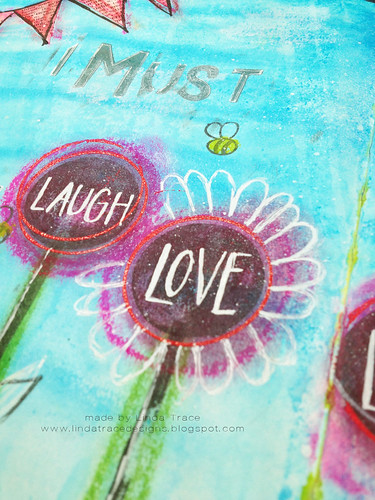
For the flowers, I used On the Strip 2 for the stems (I used my Pitt artist pen rather than stamping ink) I made sure NOT to make the very end of the 'stem' straight/perfect so it would look more like they were poking out of the ground.

I used the same Pitt Pen for the flower 'heads'
in progress 2


Next I added some pinky red gelatos to the stamped circles, smeared with my finger to blend it out. I love that it leaves a ring of pink emitting from the stamped circle :)

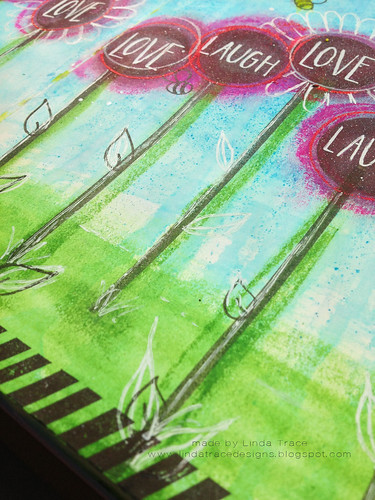
Then for some added interest, I used both white colorbox ink to stamp the plain circle outline on a few flower heads, and I heat embossed using a cherry red embossing powder, to give the flower heads some extra definition. I was purposely off-centre. I love the whimsical effect :)

To help bring the words out more clearly (they were a bit lost behind all that gelato and the ink from the pitt pen smeared a little when smudged in with the gelato too), I went over the word with white gel pen.
stamp_fill in_white gel pen


I added some doodly leaves and petals, as well as some scratchy lines up and down the stems. I also did some 'grass' at the base of each stem. (I added a little dark green gelato to the tip of my finger and gently smeared it across the base of the stems too, this make the end of the stamped line less obvious, and more as if the stem is coming out of the ground.

I added some stamped leaves from Fresh Blooms, along with some bees and ladybugs too :)

flowers_detail


a few close ups :) 
flower_embossed detail


detail2

For the clouds, I gently used the white gelato.

I added white gel pen scribbly-circles to the sun too. I love how it looks against the yellow circle!
The border of the whole page is from On the Strip.
Some white Studio Calico Mr Huey's for white flecks :)

sun_detail


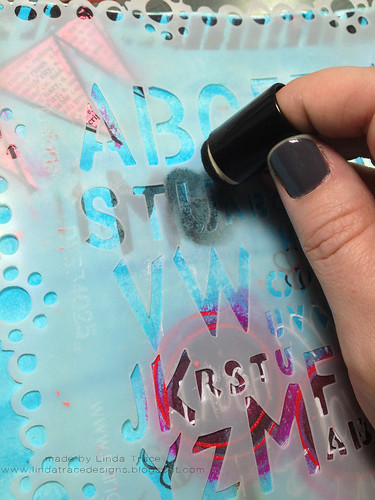
For the title, I used a Dylusions stencil and Hero Arts Charcoal Shadow Ink.


lettering_detail


And here's the full page again :)


art journal 


I outlined the quote with my pitt pen (which I had a thinner one!) and added the banner which I hand cut from some text paper and coloured/smeared with red Gelato.


I had a lot of fun making this page! I hope you like it!

Be sure to head over to the Neat and Tangled blog!

All sets will be available for purchase now!!!


Thanks for stopping by!

Linda