LINDA TRACE DESIGNS

crafty adventures of a makeup loving Japanophile!

.

.

Saturday, 3 March 2012

Thanks to Shimelle...

Hey there...

Using only ONE Studio Calico (add-on) kit and a few extra pieces, I made SIX LAYOUTS plus a mini-album. SIX!!!

Here's the story behind it:

For the past few weeks it's been percolating in my brain that I want to USE more of my stash (not just have it sitting on a shelf). I have approximately 1000 photos sitting in packets and boxes ready to be scrapped. Just sitting there. (what a waste!)

A little while ago, Shimelle posted a 'mini-class' called Creative Scrap Diving. It was all based around the idea, that you pull out some product; embellishments, patterned paper, cardstock, letter stickers or thickers etc....and then you scrapbook. With nothing but what you've chosen.  You will (Shimelle suggests) scrap faster, with less stress and get more important memories and moments captured on paper, than you might otherwise. Plus you'll use up your stash (which is why we buy it right?!)


Rather than hand-pick the elements, I decided to use a randomly selected Studio Calico kit from my shelf (they're still in their adorable brown bags, so it was like Lucky Dip!). The kit I chose was "Debate Team" from September 2011.

This kit is probably my LEAST favourite of all the ones I bought LOL and some of the colours in it are ones I really struggle with.  But I wanted to push myself.

For all of these layouts, I only used what was in the kit, plus about 6 pieces of coloured cardstock (All American Crafts), a date stamp, a pen for journalling, adhesive. (I'll specify anything else used below each photo)

Given that I've already talked your ear off, I'll just show you the photos now :)

I'll start with my favourite :)

 A walk through the clouds

Additions: paper punch to make the confetti and some Mr Huey's white mist.

A walk through the clouds_closeup

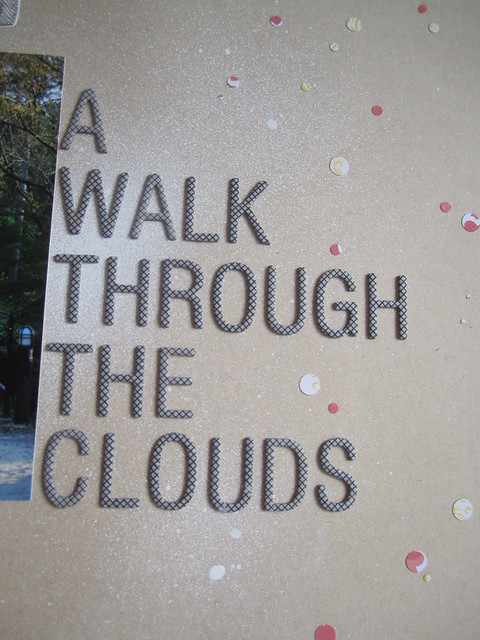
I love love LOVE how the mist looks!! 

Explore

Additions: The Lawn Fawn Polaroid Stamp and Hero Arts Basic Lowercase Letters for the 'titles' on each photo.

Hey Girl

I got the title for this after seeing those hysterical Pinterest photos of Ryan Gosling. Additional items: Teeny heart punch by EK success.

My Girl

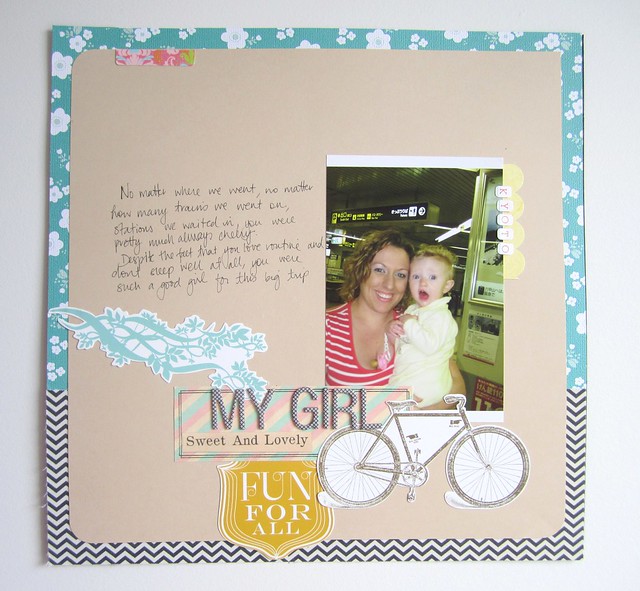
My goodness I hate my handwriting! lol

My Girl_closeup

Just a little closeup so you can see how cool and textured the Amy Tangerine Chevron fabric paper is :)

I nearly didn't make this next layout. I was almost completely out of cardstock, thickers etc. But I pulled an extra piece of yellow cardstock out and put this together:

You're Mine

and finally,

Kanazawa

Addition's: EK Success Punch.  I actually made this layout first, then used the little confetti that I punched out of the strip at the top of this layout, on the Walk in the Clouds layout.

That's all of them!

I'll share the mini album tomorrow, because I have to figure out a good way to photograph it!

I'm so glad to have scrapped some of these photos--they're my favourites from our trip to Japan in 2008.

Thanks so much for looking!

I'll be back soon

*hugs*

Linda xx

Sunday, 16 October 2011

park kinda mum

Hello again!

Thanks so much for the lovely comments on my last layout :) it's so nice to hear from you! 

So today I have another layout, I used all Lawn Fawn stamps again (can you tell I'm a bit *cough a lot cough* obsessed?!)

So anyhoo, I've been trolling around on Pinterest a bit lately and found this layout: 


I just love it. The kraft, the colours, the white ink--it spoke to me. So I decided to copy it lol! (or at least, do my take on it!)

So here is my version:

I decided to leave out the coloured paper in the background, I like the kraft too much.

Here is a whole lot of fussy cutting around Lawn Fawn Blissful Botanicals stamps :) (coloured in copics)
 Some cutesy (read: lopsided) flower embellies. (I'm very proud of myself for being able to leave them lopsided lol)
 I love how the white ink on the kraft cardstock is enough. Its just lovely. I'll be doing this again...soon.

The photos are from my iphone, using the Instagram application. I just printed them out on my home printer (with photo paper). I LOVE this look. Stephanie Howell is always doing this--I don't know why I didn't try it myself sooner.

Ok that's it for me!! If you have any questions or comments, I'd love to hear them!

take care!

Linda xx

PS Is anyone else here having a bit of a heart-attack that Christmas is REALLY soon?! wow. Decemeber Daily time is coming up!! eek!!!

Saturday, 15 October 2011

Hi there!

Just a quickie today, I've woken up early before my rugrats are awake so I could post something-


I made this using a piece of kraft cardstock and a piece of white cardstock...and lots of ink :)

All stamps are Lawn Fawn. (I mean literally ALL...oh, except for that tiny date stamp on the right).
 This is the fence stamp from Critters on the Farm, I used Jenny Bowlin Spun Sugar paint dabber to stamp and to paint the insides of the pickets.
 Lawn Fawn Say Cheese stamp, with Zing embossing powder.
The little leaves background is using Harvest Season with Jenny Bowlin Malted Milk ink on the Kraft cardstock background--I think I'm in love wtih this look.
 I masked off the clouds from Bon Voyage (before stamping them) and used Distress Inks in Tumbled Glass, Stormy Sky. Then I stamped the clouds in Tumbled Glass. I love how theres a slight white edge around parts of the clouds.

I was totally inspired by Kelly Marie's video HERE showing her make a thank you card using Autumn colours. It's actually Spring here in Australia but you wouldn't have known it lately! It's been super chilly, so I went with an Autumny feel. 
I had Mustard Seed (yellow), Fired Brick (red) and Wild Honey distress inks and used the exact same technique as Kelly Marie (why mess with genius?!) where I inked up the stamp with one colour, then gently touched an edge or a side with another colour. love love love this effect!

anyhoo, that's it for me!!

If anyone would like to follow me on twitter, I'll be putting  a link on the side of the blog soon. My 'handle' is @cutiepiechan. I'd love to tweet with ya!

Take care!

Linda xx

Saturday, 21 May 2011

hey there

Hi again!

Ugh! No matter what I ATTEMPT to do on this blog, I never quite get there *sigh* oh well, it's all in the intentions huh?!

I thought I'd share a couple of layouts I've made recently and I'll do my best to follow up wtih some crafty updates in the next few days. I've been making a lot, just no time to share them with you!

So this is a layout I did with one of my favourite-of-all-time photos of Charlotte:


 Sorry about the mess you can see around this one, I  couldn't find anywhere else clean enough on my desk to take the shot! I'll try to re-shoot this layout.

I've long been a fan of Moon Ko, who makes beautiful UBER-clean layouts. Really not my style (in the i-can-do meaning), but so so lovely. And I'm so glad I tried to use her as inspiration.

This was also using a Studio Calico sketch from weeks back. I'm really happy with it.

Here's a close-up of the journalling:


I kinda love that little hand-made tag :) All papers were Studio Calico.

Now, this card was (and is) intended for my lovely friend Linda, who was ill a few weeks back. I made the card the minute I found out she was having health troubles, but it got buried under a pile of mess, good intentions and meaning-to's; SO, in order to actually force me to get my act together and SEND IT, I'm posting it here :)


The bunny image is from Tiffany Doodles   it's a digital shop. I've never really been "ínto" the digital style of things, but I LOVE Tiffany's work. it's really beautiful. And the best part? It ranges from sweet and life-life (like this Shy Bunny image) to cutesy and whimsical--perfect! (not to mention that the prices are AMAZING!). Please go check her shop out.


For the bunny, I printed the image onto Watercolour paper (just ran it through my normal printer) and then used Distress Inks to paint the bunny's fur. Here's a closeup:

The thing I loved with this in the end, is that you can barely see the black lines of the original image (which are already whispy and faint), so it looks like I literally painted Mr Bunny here ).

I used Antique Linen, Walnut Stain and that's about it!! (SUPER easy :))

If you have any questions/would like me to (attempt!) do a video to show you, I'd be happy to!


Here's the inside of the card. I used a Hero Arts stamp (NO idea of the name :)) sorry lol.

Ok!! SO I have kids who are causing daddy far too  much trouble to be dealt with alone right now, so I have to run!

Leave me some comment love :)

talk to you soon sweets!