Hello lovelies!
I'm back with a layout I've made for the latest ABNH Challenge. I meant to post this a week ago. Sorry! Pregnancy brain strikes again!
So the challenge this time was to use vellum.
I love this layout. It's rare I say that about my own work, but i really do. I had so much fun just fiddling and playing, putting ideas I'd had into reality.
I've been watching a lot of videos by Janna Werner (CRAZY CRAZY TALENTED!!!!!!!) and I love how she uses fun little elements all around her pages.
The turned-in corner is inspired by her too :)
How about a few closeups?
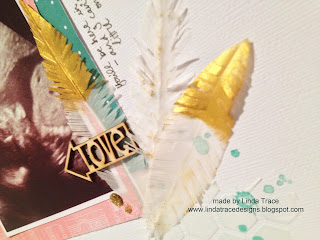
Texture paste and a Chicken Wire/Hexagon stencil. Some drips of GELATO-watercoloury mixture.
The little glitter peg (clothes pin) was just a plain peg that I added the gold glitter to. (I'll be doing this again SOON)
Some hand-made vellum flowers (SO SIMPLE AND FUN!!!!!!) I added some gold Delicata ink to the ends. LOOOVE
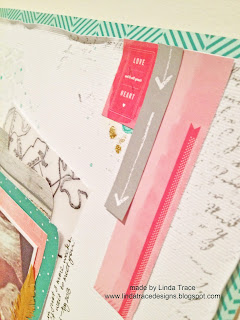
You can see the vellum piece I stamped using the Hero Arts Roman map stamp (I love that thing!) Layers and strips and stamping--happy happy place.
Well that's it!
Hope you like and I'll see you again soon!
Sunday, 25 August 2013
An apology, A Card, and some news :)
Hi there!
I'm SO sorry it's been 10 days since I posted!! Time has been FLYING past in this last few weeks of my pregnancy and I can't seem to keep the days straight!
I haven't been crafting as much as I'd like to, but thats mostly because standing up at my craft desk is uncomfortable (and it's hard to reach around my big belly lol!)
Anyway, I DID manage to make a card that I want to share with you today but first I have some SUPER DUPER exciting newsssss!!!!!
OH
MY
GOODNESS!!!!!!!!!!!!!!!!!!!!!!!!!!!!
I am beyond thrilled and excited and to be honest, more than a little stunned!!!!!!!!
I am a HUGE fan of Faber Castell and have been for many many years, and since my sweet friend Lisa sent me some Gelatos (and Steph sent me some more!!), I've been unable to put them down!!!
I can't wait to start and I'm pinning ideas like a MADWOMAN.
Thank you Faber Castell Design Memory Craft so much for the opportunity!!
Ok now on to the card (which, ironically DOESN'T have any FC product on it lol). I loved the idea of a window-box of flowers sitting outside an old villa-type house.
These flowers from Wplus9?! HAPPY PLACE!!! I had so much fun stamping them! To make it easier, I ran the entire die (it comes with all the individual flower dies attached to each other as one 'piece', you can snap them apart for individual dies but I kept them all as one) through my Big Shot three times and diecut 3 of each. I knew I'd want lots to play with and this just seemed simpler :)
Next I sorted them into little piles and went to town stamping and layering inks to make them all look a little different from each other but not TOO different.
I used some Tim Holtz distress Crackle Paint on the window diecut. It's hard to see in this photo despite my best efforts, but it looks fantastically old and kindve like an old Italian Villa's windows. (I'll tell myself that anyway!)
I put acetate behind the window (for the glass), and used some Distress Inks VERY lightly and some white Colorbox ink to make a sky on a panel of cardstock that sits behind the acetate, to make the sky.
You can see all the layers here, I simply laid out all my flowers and arranged them how I wanted, then started adhering them down in layers.
The orange cardstock from Bazzill is embossed with a Tim Holtz Brick embossing folder. The banner and sentiment are from the wonderful Simon Says Stamp :)
I'll be back soon with more Wplus9 cards. I can't stop playing with their stamps!
Thanks so much for stopping by!
*crafty hugs*
Friday, 16 August 2013
Neat and Tangled Blog Hop!
Hello!
Firstly I apologise for this post being late! I made an error with the post schedule time . SORRY!
Welcome to the Little Tangles Birthday Bash blog hop!
I am hopping along with some of my favourite friends to celebrate Neat and Tangled's first birthday even more! You should have arrived from my wonderful friend Mary Dawn's blog. If you got lost, or want to see the full list of stops head to the Little Tangles blog!!
Once you've commented on all the blogs in the hop, you have a chance to win a HUGE prize package!! Be sure to see the Little Tangles blog for full details :)
My card is pretty self explanatory, so I wont bore you with a step by step, but if you have any questions, please let me know in the comments!
Next stop on the hop is the delightful and oh-so-talented Laurie!! Hop along with me to check out her gorgeous creation :)
Thanks so much for stopping by!
Linda :)
Saturday, 3 August 2013
Sympathy card
Hello friends
I wasn't going to post this card. It's a sympathy card for a dear friend. It didn't seem right to post a sympathy card, know what I mean? But I know that a lot of people find it hard to make sympathy cards, especially when sympathy is required (it's hard to make something when you're just feeling pain for those you care about).
So I thought I'd share it. Maybe it will help one of you when you next need to make one. I don't like my sympathy cards to be dark or dull, I think that life is bright and sparkly (for the most part!) so a sympathy card should be a reflection of that. The sentiment can be quiet and comforting in my opinion.
So here is the card:
I used my gelatos as paints in a way. I smeared the colours i wanted into my paint 'tray', added a tiny bit of water, dabbed in my paint brush, then flicked it with my finger to create the tiny specks of colour. The larger drips/spots are using a different (round-headed) brush with LOTS of water on it, and instead of using my finger to spray it, I just gently shook my hand up and down a bit, flicking the coloured water/gelato mixture onto the card.
Next I affixed a doily, trimming off the edges. I stamped teh sentiment (from Simon Says Stamp) using Versafine Smokey Grey (Black was too dark and sharp).
The button is from my sweet friend Chari's etsy store, the little star and sequins are from a sweet friend.
The gold/glittery 'spots' are made via a Jennifer McGuire technique--first you squirt varying sized drops of Glossy Accents onto your craft mat (or similar) cover them wtih glitter, then leave them overnight to dry. When you come back later, you can gently pry them up, and you'll have handmade embellishments! So fun to make and perfect to add a little sparkle to this card.
Anyhoo, that's it for me!
Speak to you soon
Linda xx
Friday, 2 August 2013
New challenge over at ABNH!
Hiya!
It's time for another challenge at ABNH and it's a great one!
SO you need to raid your recycle bin to find something fun to use!
After sorting my spellbinders dies into a smaller storage option, I had a lot of packaging left over--so that's what I used!
Here's my card:
To make it I used alcohol inks on the plastic acetate packaging from the die. I used sunset colours :)
Then I diecut the window from neenah solar white cardstock.
Once the alcohol ink panel was dry, I stamped the Hero Arts Musical Walk stamp onto it. I then stamped it again on a separate (clean) piece of plastic/acetate.
I adhered a piece of white copy paper behind the alcohol-inked acetate, to help the colours shoow through. I then adhered that down to the cardbase.
I adhered the second piece of acetate with the stamped image (but no alcohol ink) to the window die, and then using dimensional adhesive, stuck it onto the other piece. This gives nice dimension and a lovely shadow effect to the window die. It also makes the shadow of the children (stamp) look a lot more real :)
Here's a close-up so you can see the fantastic effect the alcohol inks give and the lovely shadow you get from the window die.
I love that the top piece of acetate/packaging makes it look like a real window with glass in it :)
OK! That's it for me, I'll be back again soon I hope!
Talk to you then! Hope you'll pop over to ABNH to check out the rest of the DT's work and maybe join us in the challenge!
*crafty hugs*
Linda x
Subscribe to:
Posts (Atom)