LINDA TRACE DESIGNS

crafty adventures of a makeup loving Japanophile!

.

.

Friday, 25 February 2011

I-love my I-top

Hello friends!!

Authors note: this blog post was originally for the store blog, so if it seems a bit 'producty', that's why. However, I really do LOVE my i-top and to be honest, it took me a while to figure out how to use it, so I thought I'd give you this 'tutorial' of sorts in case you were interested!

I'm so excited about this tool that I can barely manage an introduction, so I'm going to leap right in--I give you...

I-top Tool
I LOOOOOOOOOOOOVE this thing!!

I'll admit freely, I've gone a little big (ok, a lot) brad-crazy since breaking this bad baby out of it's box.


This is just one of the cards I made with a homemade brad for the embellishment.


Sorry the picture is so dark, I was having some issues with lighting for a while and I've now sent the card of to it's intended recipient, so I can't re-shoot it.

I used a little EK success Cupcake punch that I got a long time back at a craft fair to make the cupcake and stuck it on top of the yellow brad. (I cut the bottom out of vellum paper and then re-cut the top 'icing' portion out of chocolate covered cardstock and covered it with Distress Stickles and added a gem stone for the 'cherry' on top.

OK--on to the making of the brad.

Here's a step by step (warning: lots of photos coming :))

NB: There are 3 sized brads you can make. A 16mm, 23mm and 28mm diameter.  To make the brads, you need to cut out a 'Topper' (the kind of circle shape you see below) of the correct size. You can use either a punch that is available (which I've used below) or you can purchase a template which you lay on top of your paper or fabric, trace and then cut by hand. (both options are in store).

Using the appropriate sized punch, punch out the required paper (you can also use the template to trace and cut with scissors--this is a better option for fabric covered brads).

Next you hold the diecut Topper in front of the pink carriage (the 'suction cap' looking section) on the top of the I-top.

See how the right side of the i-top is 'facing' the camera? You can pull it up a little to swivel it so it faces the pink carriage when it comes time to squeeze the two sections together.

**this allows you to choose which size you're using. The smallest brad size requires you use the smaller 'punch' and 'carriage' sections. If you use the wrong size, it wont work. To change the size you're using, you just pull the top section up (away from the handles) and swivel them in the appropriate direction.
This is what you will get in a packet of "Brad Daddies".  The top two rows are the insert pin of the brad, the bottom two rows are the 'head' of the brad (which will be covered in fabric or paper when you're done)

See? Now they're facing each other. I'm still holding the diecut.  Next you take the brad "head" and sit it with the paper (centred if possible.)

Next, slowly squeeze the handles so that the two sides come together, the smaller metal side should push the paper/fabric topper piece AND the brad head, inside the pink carriage.


In the next photo, I've rotated the right 'pushing' section out of the way so you can see what your paper will look like. The 'flaps' will stick out everywhere and that's fine.
Just fold the flaps in with your finger, making sure they're pushed well into the brad top.
Insert the brad base (the part with the 'pin' or arms that will eventually pierce through your paper and be opened to secure the brad in place)
Turn the handles to face each other. (NB though you can't tell, the brad base is in the left hand side of the handle, the brad top with it's paper covering is in the right pink 'cup'-side of the handle.

Squeeze the handle part together (like you would a crop-a-dile or pair of shears) and the top sections will squeeze together.

This is what you will now have. The brad base will be lodged securely inside the brad top.

Remove the entire brad gently from the pink cup. (You can push the pink cup backwards off the metal top holder, so the brad pops out easier, I find this results in a neater brad)

Here is your completed brad!


 All I did after this step is wet my fingers just a little (you could also lightly spritz the paper brad topper with a mini mister, but I just wet my fingers) and then gently go around and push those little ridges (on the edge) inwards, so they didn't stick out so much.

You could easily leave your brad as is at this point, but  I'm sure, as you saw on my card at the top of this post, I added an embellishment. 

I've also made brads out of material, or other papers but topped them with felt embellishments or even mini Prima white roses (which I've coloured with Glimmer Mist) and they look super cute.

I'll show you those soon!!

So get out there and have fun making these gorgeous brads! There are 3 sizes and a LOT more things you can make with an I-top, but so far, I've only tried the brads. I love that I can make a brad to match my card/layout etc perfectly!

Talk to you soon!

Linda xx


Thursday, 17 February 2011

waiting + waiting

hi there all of you!

As is often the case, this is a bit of a 'bibs and bobs' kind of post.

Firstly, sorry for the delay in updating, it's been a real kicker of a few weeks. *sigh* I've got a little gadget down the bottom of this blog that has what looks to be a crow (or Raven) and the initials BWO--in case you're not sure what it means, just click on it (hopefully the link works!)...it will take you to the breakdown of the meaning, but basically it means Blogging without Obligation. Not feeling the NEED to blog 65 times a week or the need to apologise if you don't, if you have a long update or a short one etc etc. I love this idea. That a blog is it's owners OWN blog and can be whatever we want it to or not to be (that is the question...lol. sorry couldn't help myself). So I want to make it clear that when I say sorry I haven't updated in a bit, I mean that I"M sorry I haven't done it. I love updating a couple of times a week and giving you all something else to see. (even though you're a quiet bunch, I know you're reading from my stats page lol hint hint).

So it's been a busy and stressful few weeks for various reasons but thankfully most of it's over now. Charlotte's surgery was last Thursday and it took a bit longer than expected but everything seemed to go well. She had an awful time in hospital, much more aware of what was going on and bursting into tears several times a day if she ever woke up to see me sitting anywhere but right next to her (and often even if I was there). When we got home she seemed fine until about 2-3 days after the surgery she developed a bit of a rash and an upset stomach (to put it delicately) and she screamed and screamed for hours. The poor little love, she's usually so cheery 24 hours a day, this was a real shock to us and hard to deal with.

For the most part she's better but she's still having some minor side effects from all the medications she's on for the next month. Hopefully it will all settle down asap. For those of you who aren't aware, she doesn't have any serious condition/illness; she has had issues with the tubes leading from her kidneys to her bladder which could have been serious but aren't now that they're fixed.


OK, so while we waited for her to come out of surgery, I took this quick shot of us waiting for her. It's such an awful time waiting for a child to come out of surgery, it's like a limbo. I can't imagine what it's like for "serious" surgeries, but this one was bad enough. I didn't take ANY photos for her last surgery, it was too much to think that it could be her last photos (as tends to be what runs through your mind in such stressful times). Matt said he didn't want to ever remember those moments, but I know: photos or not, I'll never forget them.

This time however, I decided to capture the memories as they're something that really makes up our lives right now. Her medicine, her doctors trips, her surgery etc. It's all a part of our lives and that's worth remembering.

Here is a layout I did using that photo and Studio Calico papers. (or papers from their store anyway, they're various manufacturers);


Tim Holtz Rosette die in overdrive for this one!! I also used the uber pretty Hero Arts children's parade (called It's a parade I think?!)stamp down the bottom of my journalling 'tag'. love.

 This layout was quite plain and dark at first but then I thought, 'no, there were moments of hope throughout that time so it needs bursts of colour to represent that.'

I hope you like it :)

I'll have some (late) Valentine's cards to show you next time as well as some gorgeous Valentine's that the lovely Ayana made for the other blog, but I didn't get to use. They're late, but hopefully that will be forgiven :)

talk to you soon

Linda x

Monday, 7 February 2011

Etsy Inspired Challenge #125 card

Hi again!

As I mentioned in the yesterday's post, I decided I'd like to aim to participate in more challenges, so I went for the Etsy Inspired Challenge number #125 and I'm going to throw my ring in that hat for the Simon Says Stamp blog's current challenge with cards themed for Love is in the Air!

Here is my inspiration photo:
Its such a pretty little headband!! There were several items I liked (so I might go back and make more if I have time before Charlotte's surgery on Thursday) but here is the card;
I'm really happy with it! I went very literal with my interpretation but that's ok.

I stamped the Hero Arts Silhouette onto black cardsdtock using HA Snow ink. I diecut it out using a nestabilities die. I then edged with the same ink.
Next I stamped HA Dots Cling stamp using Snow Ink onto a larger diecut piece of red cardstock and set that aside. Next I stamped the same Dots stamp with Versamark ink and embossed with white embossing powder.

I layered the three pieces together, the top (cameo one) with pop dots.

I then diecut a piece of white cardstock with a Fancy Labels Die from Spellbinders twice, cut them both in half, stamped the sentiment on one layer.  I then adhered the blank label to the flat base of the card (on either side of the cameo section) and the other directly above it with pop dots. You can see how nice the dimension is in this photo.

Finally I layered those onto some gorgeous purple Bazzill Cardstock, which I'd trimmed to size and cut the edges off with my Corner Chomper (The photo edge).

Lastly I adhered the purple cardstock onto some white, and then that onto a pretty bright turquoise for the cardbase.

Here is the inside of the card:


The Sentiment is HA too.

I'm really happy with the result! Pretty, bright but yet really regal. I think this card would be appropriate for any age.

I'm going to enter it into the HA Flickr competition too for friendship as I'm going to send this card to my best friend :)

Hope you liked it!

Thanks for looking :)

Linda xx

a quickie

Hi everyone!

This is just a quick post that doesn't have a card (though I do have a card waiting here to be blogged about, but that will be up tonight).]

I'm sure you're all aware that the a2z store had to close rather quickly. Some of the events that led to this decision have recently come to light and whilst it's not for me to discuss them, there were good reasons for the owner to shut the store and while I'm sad about it, I fully support her decision.

I wanted to let you know that I've decided to remove the a2z blog altogether from 'cyberspace' or whatever you want to call it. It was all my own work (other than the guest designers I had on), so I feel that it's only fair that the cards, projects and text that I slaved over (and I really did slave over a lot of it, there was a MASSIVE amount of work put into that blog), should be here on my personal blog now that the other one is no longer in use.

I've imported them all over to here (papertracer blog), so you can see the projects I made etc.  I've removed all links to the store (which is, of course, no longer running) and any mentions of the store in general where possible.  This was to save confusion from anyone new to my blog who didn't know that the store was no longer open. (I didn't want to send people to a dead link).

The posts from the a2z blog are now slotted in with my personal posts from this blog, in date order as they were posted, so you'll be able to find them throughout the past 4 months of this blog's updates.

I'm still very upset about everything that's happened with the store (not the people who ran it), especially the loss of hope that this crafty hobby of mine was becoming a 'real' job. My family and I were planning a move to the U.S, I was so inspired by the fact that I was showing so many of the store's customers new ways to use products and ideas--it truly was a dream come true...until it all ended of course.I am however, still friends with everyone involved with the store, so I'm thankful that out of all of this, I'm still lucky enough to have these friends I made.

I'll get over it eventually I'm sure, but I still have days where the loss of the future I was building , still leaves an echo inside me. That might sound a bit dramatic to some of you, but I haven't felt so stimulated and excited about my future (apart from in regards to my gorgeous little family of course), in a very long time.  The loss of that is hard to simply forget.

However, I hope that someday soon I might be offered a DT position or something like that with someone somewhere (it's starting to sound like a Broadway song!), so I'm going to try to focus on inspiration challenges and getting my 'name' out there.

For any of you readers, whether you be joining me from the a2z blog originally or you just found my personal blog through flickr or the like, I'm so happy to have you here along for the ride with me.

If there is ever any technique/style/product you'd like me to explain or do a tutorial on (or anything), please don't hesitate to let me know! I'd love to help you out if I can!

So until later tonight when I'll show you the card I made for the etsy-inspired challenge for this week, I hope you enjoy the additional posts that you can now find here on my little piece of bloggy paradise :)

take care and I'll see you soon :)

Linda x

Sunday, 6 February 2011

A shadow of a card...

Hi!

So I've been crazily in love with all of these gorgeous silhouette stamps that are coming out lately. Papertrey Ink had them about two months ago and I was going to head straight over to the site to buy one but then I saw the "LP195 3 Silhouettes" set from Hero Arts and decided it was a MUST have!!

This next card is for the challenge Jay Gee's Nook is having and I looOOOVE it!!

Here is the inspiration photo:
 
 
 Aren't the colours amazing?! So pretty, subtle and feminine. LOVELY LOVELY LOVELY.

Here is my card:


Several steps, all of them simple :)   I love it when a card is simple but gorgeous don't you?! 

Here is a closeup--
First I cut a piece of kraft cardstock to size and then stamped it with Hero Arts Fancy Flourish Cling stamp using Hero Arts Snow Ink. I set that to the side to dry. I then cleaned off my stamp and used it again to stamp a small strip of white cardstock with Versa Colour Tropical Green Ink. I edged the strip with the same colour ink and set that aside to dry too.

Next I took my brand spanking new Spellbinders Lacey Circles Nestabilities and cut out a piece of DCWV purple patterned paper. I also took some white cardstock and diecut it into a circle and embossed it using Nestabilities Circles Die Large.
Next using my stampamajig for positioning, I stamped the 'ponytailed' silhouette girl onto my circle. I adheres the circle to the lacey circle paper.

Then I cut a strip of green bazzill cardstock and adhered the now dry white & green strip to that, before stamping the sentiment (from Hero Arts CL 351 Friends set) in Memento Tuxedo Black ink.

Next I adhered all the parts onto the now dry Kraft card 'base' and wrapped some jute twine around the base. I finalised the card by adding some teeny bling stones onto the card at the sentiment strip and one in the girls hair (for a little extra touch--I love how this looks!!)


That's it!

Anyhoo, that's all for me! I'll be entering this into the Jay Gee's Nook challenge as well as the current Hero Arts Flickr Group Challenge for 'friend' themed cards.

I'll have another card for you tomorrow!

Have a great day lovelies!

Linda xx
Saturday, 29 January 2011

Stationary Set follow up...cardsets!

Hi again!

Here is the follow up stationary set as promised!

This is less of a stationary set than it it a 'card set'.  I made these for my sister in law and my 'aunt-in-law' (if you know what I mean!)


Same technique, stamped (Hero Arts H5428 Hello Flags) on white cardstock, coloured in with Prismacolour Pencils (is it spelling it wrong if I use the British/Australian spelling-of colour-even though it's a product name?! hmmm).
Added a sentiment, then matted on black cardstock, then added to a notecard.

 As you can see I rounded the corners with my handy dandy Corner Chomper. I chose my little-used 1/4" corner this time. I like it. I thought the edges needed rounding to bring a nice contrast to the sharp spikey edges of the banner. love that stamp.


 I used two of each colour in the pack of notecards.


 Here is the set for my aunt-in-law. She's an artist so I wanted something simpler for her. a) because I don't want her to see how bad an artist I am lol and b) I'm sure like most artists she has a lot going on in her mind (artistically I mean) so I wanted the card to be simple and not in any particular style. 
How cute is this little bicycle (H.A F5293 Bicycle) though?! I don't even ride a bike and I love it:)

It's a bit hard to see in these photos, but I coloured the flowers in the bike's basket different colours on each card. I also rounded the corners of the notecards and the black matte cardstock, but not the white cardstock with the stamped image on it. I like the contrast and unusual edge this created. I'm happy with it.

Well, that's it for me!

Hope you liked!!

Lots of love

L xx

Friday, 28 January 2011

Letter Set...

Hi!!

I've been meaning to make something like a letter set/stationary set for quite some time now.  I saw that my lovely friend Joy had done a really masculine one on her blog a few weeks back and decided it was time to get the idea in my head onto paper and card.

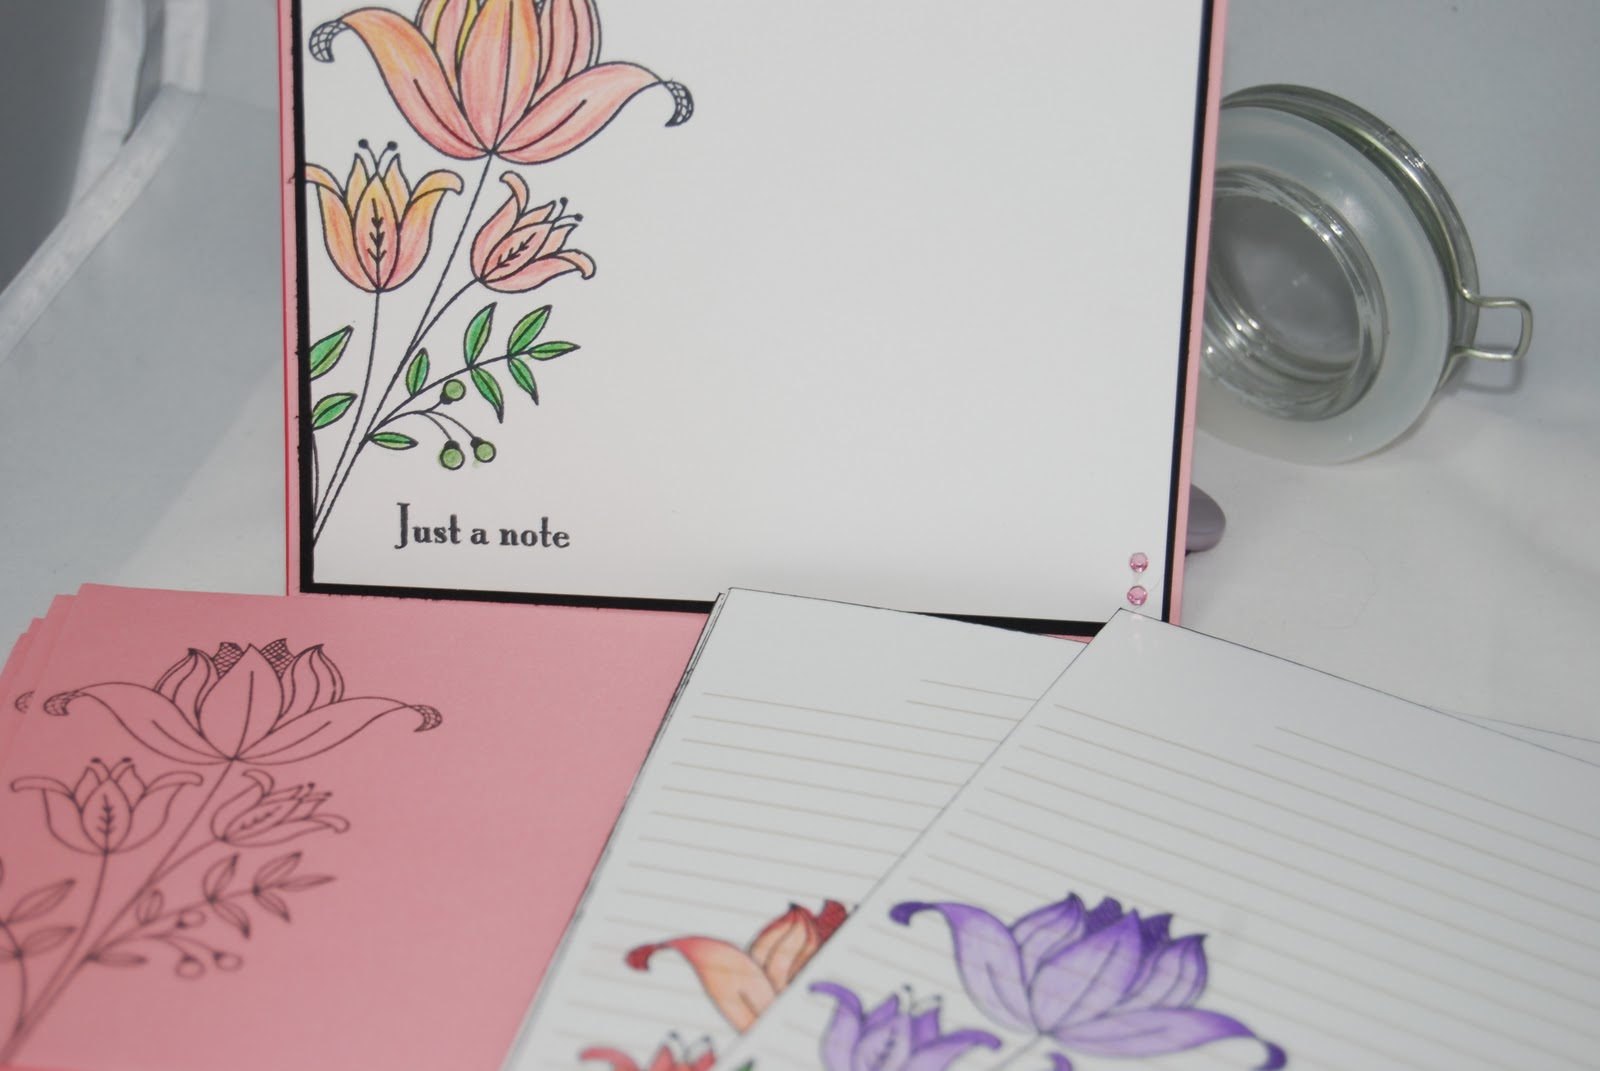
So, here is a letter set I made for my gorgeous mother in law Di,

 It was SUPER simple to make, just cut some white cardstock to size (4"x5") then stamped the Hero Arts K5431 Tall Flower stamp on the edge (making sure to 'run off' the edge with the stem), then I coloured in with my Prismacolour pencils! love those pencils).
  

 Here you can see the shading I did.  I made each flower (or each card) slightly different, as the real flowers would be. With all of them, I started with the lightest colour and did the entire flower, then I added in darker shading in various places. On the tips for one flower, on the base for another, streaked throughout the entire petal (as you can see on the left hand card in the above photo) etc etc.
This was very similar to using Copic Markers. Start light, then add in shading. Lastly, go back over the whole thing with the lighter colour to blend.
 Here is the purple/lavender set. I love how the shading really really worked well. I added a little yellow to the tips of the petals on the far right card.
 I could have used some Gamsol (or similar) to really blend the colours in well, but a) I don't have any yet (haha) and b) I wanted these to look hand coloured. That's kind of the point right?!
The leaves I coloured in a very basic way. Bright light green all over, then added darker almost olive green on various sides of the leaves (or in the centre 'vein').

After finishing the colouring, I added the "Just a note" sentiment from a PTI stamp set. I then mounted the white cardstock onto some black cardstock 1/8" larger than the original piece. I then trimmed 4 of the Hero Arts Notecards in half (down the seam/fold) to make 'postcard' type cards. I then mounted the pieces onto the half-notecards.

**You could very easily just use the notecards as is and it would look perfect, I just wanted these to be more like postcards than notecards.
On the back of the notecard (what would usually be the white interior), I stamped the Tall Flower again in Versamark to get a watermark image (no photo for this :)).

Here is the matching letter set.
I used the lined paper pdf provided by the amazing Shari Carroll over at Hero Arts months ago (I've been meaning to do a letter set for a while now.) HERE is the link.
All you do is print onto whatever paper you're using (I used Hero Arts Layering paper) and then trim it in half (you get two 'sets' of lines to each page).
I stamped and coloured in exactly the same way as the notecards, I just didn't add the sentiment or gemstones.
On the back I did the watermark again (sorry for the photo, it's REALLY hard to get a good clear shot of a watermark in a house as dark as this one!)
see the watermark on the bottom left of the pink??? it's there...really...no, REALLY.
 Of course, I had to do matching envelopes too.
 But I didn't colour the envelopes in, didn't need it.

 This is the whole set completed.


Anyhow, I hope you like this! I really had fun making them.

I'll be back tomorrow hopefully with the follow up project I made (I was in colouring mode by this point haha!)

Hope you're all enjoying much cooler weather than I. It was well over 40 degrees today and I was holed up inside in the air-conditioning (which I'm sorry to say, did a poor job).

I'd love to hear what you think of the letter set!

Love,

L xx


Thursday, 27 January 2011

Happy Birthday my sweet sweet Charlotte

Hello...

Firstly, thank you so much for all the amazing comments about my New Years Intentions album and my Australia day themed challenge with Joy. It's incredible how much more exciting this is (and how much more creative I feel) when I get some feedback--especially the positive kind *wink*!!

Today is Charlotte's 1st birthday. My sweet, chubby, happy little baby is 1...where has the past year gone?! It was so fast!! I'm sure I was taking better care to be more involved and notice time etc and I have noticed more, I have been more aware...but jeezo louiso how time has flown!

This is my littlest love on the day she was born:
naaaaaaaaaaaaawwwwwwww  
Wasn't she a cutey?! All bendy legs and skinniness...


this is her now (this shot is actually from about a week ago, but it's a goody


She just melts my heart.

If I'm being totally honest, I had a hard pregnancy with Charlotte. I was NOT prepared to have another baby, I was nervous, sick, tired, in pain a lot, swollen, NERVOUS, worried, SICK...blech. The whole thing was rotten and I hated it. (I hated that it was rotten). Charlotte's birth was LOOOOOOOONG and haaaaaaaaaaaaaaaaaaaaaaaaaaaaaaaaaaaaard work. By the time she'd finally arrived I was so exhausted I had no ability to (what I call) "emote" any more. I just looked at her and thought, 'oh, a baby...that's nice'.  It took me a few hours to relax, stop being in pain, stop freaking out (the birth  was pretty traumatising to tell you the truth and it took me several days to get over it emotionally and 'psychologically'). When I did finally 'come down' from the whole experience I looked at her and my heart just settled into it's proper place.

Since then, it's as though Charlotte knew every worry, every concern, every thought I had about how our lives would be changed when she came and she decided to be the TOTAL opposite of everything I feared.

I feel I should elaborate a little. Isabella was the perfect pregnancy. I had nausea but no real illness, it lasted less than 10 weeks. I had a great pregnancy the whole way through. No cravings, no sickness, no pain, no bloating etc etc. The birth was, well, birth. It's an amazing thing but it's long and painful and arduous, but worth the effort. However, Isabella was the complete opposite of her pregnancy, in reality. She didn't sleep alone until she was almost 18-20 months. Yes, she slept ON me for that time. The longest she slept alone (apart from the first few weeks where most babies just sleep constantly anyway), was maybe 2 hours. I was exhausted. I was stir-crazy and housebound and totally in love with her, so I went with it. But it was so so so hard. Even now, everything with Isabella is work, drama, effort. She requires major thought and organising and planning.

Isabella is completely and totally wonderful, but she's not easy.  She needs notice when something is going to happen, it takes her weeks to get over any change, if something scares her (no matter if it's fleeting or major), she remembers it and worries about it for MONTHS afterwards...she challenges me CONSTANTLY, is stubborn (*cough* so am i *cough*), funny (so am I haha), smart (me not so much lol) etc etc etc (you get the picture)

Charlotte?? She's quiet and easygoing and cheery and sweet and EASY. She (almost always) goes off to sleep with nary a whisper. She sleeps through the night...
She sleeps THROUGH the night...
Can I say it again? SHE SLEEPS THROUGH THE NIGHT!!!

Ok, I'll admit, she sometimes stirs at about 3 am, I feed her milk while she stays asleep, then I go back to bed. AND I SLEEP TOO!!
Charlotte really is like a little prayer that's been answered.

I love Isabella without reserve, question or limit--don't get me wrong. But like I said, she's work and challenging. (Which I love in it's own way)

But I love Charlotte for being easy too. I love her little chuckle (it's really a belly laugh), I love that she's ticklish behind her ear and she leans her head into my mouth so I'll blow raspberries on that spot. I adore that she comes up to me with her bottle hanging out her mouth and climbs up me (like I'm a mountain) and then leans her entire body on mine while she tips her bottle back and drinks her milk. I love love LOVE that she's generally quiet/silent/self-sufficient...until there is food in the vicinity, then she becomes Italian. She's verbal and loud and her hands fly about in gesture, she even does this 'one hand clapping' thing to mean 'give me that'. I love that she and Izzie hold hands when they're in a shopping trolley together. I love that Charlotte's first word was mamamama and her second (a while later) was Izzzzzzzzzzzzzzz.

That sweet little miracle of  wonder was born one year ago today...and my life will never be complete without her, will never be the same and will never be anything less than amazing with her in it.

happy birthday baby.


So anyhow, today, to be honest, was a nightmare, neither of the girls slept and both were exhausted, grumpy and crotchety all day. (so was I as it was HUMID here..blech)

lol). It's all a part of the magic.


And now it's 8:20pm and they're both asleep,,,,so this little tired duck is going to go collapse in a heap :) *ha...that rhymed*

I'll be back in the next day or two with some crafty goodness for you :)

Lots of love,

The mummy who is VERY happy not to be in the day one year ago...coz that day was hard and painful (lol)...I'm Much happier to have my little love here with me rather than on the way.

Talk to you soon--thanks for stopping by

L xx

Wednesday, 26 January 2011

Happy Australia Day!!! (and THREE cards!)

Hello!!!

So here in the big "Down Under" (Just so you know, we Australian's never actually use that term haha!), it's Australia Day. January 26th every year is a public holiday and most people swarm towards their local city centre for the massive fireworks displays that are put on for free by the local governments.


This is a great shot of the fireworks that are held over the Swan River, which sits RIGHT in front of Perth CBD. (FYI Perth is where I live, it's the capital city of Western Australia.)
There is a lot of info surrounding the history/background of Australia day, but too much for me to write here. If you're interested, click HERE and have a read. 

A few weeks back, I asked my dear friend Joy, if she'd like to participate in a little 'Aussie fun' in the way of Australian-inspired cards and she said yes!  I'm so excited.  If you would like to check out the amazing cards she's made for this special even, click on over to her blog.

So we decided to go with the Green and Gold theme, which was REALLY hard for me, I never like this combination and to be honest, don't even like it as our National Colours, they just clash to me, but that's what our colours are, so let's go with it! I tried to make it work as best I could.

Anyhoo, here are my cards. 

This first one is a bit cheeky, it's a bit of a play on what I'm sure you poor unknowing 'foreigners' are subjected to in the media when it comes to Australians (Think Crocodile Dundee...*sigh* can anyone say Stereotype??). Anyway, I thought it would be funny to do a bit of a silly card to address the fact that very little in Australia, is like you see or hear in the media.

  • Hero Arts (HA) Snow Chalk Ink stamped "Happy Birthday" (from H.A Birthday Sayings clear stamp set)repeatedly on vellum to tone down the UGLY orangey-yellow cardstock, I really love the effect. 
  • HA Graph Background stamp in Tumbled Glass distress ink, stamped onto white cardstock, then edged/distressed with a little Walnut Stain DI. (Punched the edge with an EK Success Notebook edger punch). The "Just a Note" title and little paperclip are both from the Hero Arts "Just a Note" clear stamp set.
  • HA Green ribbon (from their Christmas release) and some yellow eyelet-edged ribbon from my stash.
  • HA Dark Green notecard from their "Foliage" set, which I swiped around the edges with the HA Snow White Chalk ink to make it a more attractive colour.
This is a TERRIBLE photo (sorry) but I was trying to show you my home-made brad using my handsome little baby Mr I-top and some cute gingham fabric.
I used Lawn Fawn's "Harold's ABC's" and H.A Happy Birthday Clear Stamps to stamp the sentiment in Memento Cantaloupe and Pear Tart inks.

Australia Day is generally one big party for most people, so the sentiment seemed appropriate (as well as making a bit more sense of the 'list' on the front of the card).

Here's card #2:

This card was kind of inspired by a card feature Nichol Magouirk did HERE.   I saw it months ago and always wanted to try to replicate it, so this is my take.

The backing card & circle frames
First I trimmed the Hero Arts Green notecard down to 4 1/4" long (it's already 4 1/4" wide, so no need to trim that too).
I used the Hero Arts CG144 "Time to Stamp" cling stamp and embossed with AC Zing Mustard Yellow embossing powder.
Next I took some matching yellow cardstock (AC textured) and cut it into a circle with my Spellbinders Nestabilities Standard Circles Large Die.  Then I cut a white circle with the smaller frame. I edged both with a touch of Peeled Paint Distress Ink and attached both to the centre of the card.

The Butterfly

Taking scraps of ribbon, I adhered them onto a small piece of plain cardstock. (any scrap cardstock will do fine)
**(I covered the cardstock with 'tape' from my Glu Glider Pro and then just lay the ribbon on top gently in case I needed to move any of them around, which I did in the end, before pressing the ribbon down firmly.)
I didn't bother to trim the ribbon ends if they were scrappy as they'd be cut off by the die anyhow.

Next, I ran my cardstock through my Big Shot machine using a Cuttlebug Butterfly die (I have no idea of the name, I got it ages ago).

Because of the thickness of the whole thing, the die didn't quite cut all the way through (I could have used an extra piece of cardstock as a 'shim', it would have helped), so I just carefully snipped any little areas that hadn't cut properly.

Then all I did was adhere it to the centre of the white circle (on an angle obviously) and added some pearls from the Prima e-line. (Remember me saying in my last post that I really need to update my prima stash?! lol)


Here is a close up of the butterfly. I love the textural look of it. In reality, it's very 'touchable'. The shiny sections of the two Hero Arts ribbons (the two green) really add something to it.

Although this card was made with the Australian colours in mind, it would work in a multitude of other colours. I'm actually thinking I'll make a sympathy card out of the exact same style, but with darker, more muted colours...I wish I could do that right now actually lol but no, I have another card for you!

OK!! Onto Card #3...(are you sick of me yet?!)

 This was actually the first card I made for this little challenge of ours, and I'm happy with it. I thought and thought and thought some more about it, did I want to add some red somewhere, should there be birds on the tree branches ...and you know what?! Yes, there could have been both of those things, but I'm going back to my trusty old 2011 Intentions album and trying to:

remember this?!


And so this card was left as it is!! And I happen to think it's pretty darn cute.

hope you like it too!

here's what I did

I stamped some white cardstock with the HA Graph Background stamp in Tim Holtz Pumice Stone DI.
Then I die cut them into clouds using Papertrey Ink (PTI) cloud dies.  I then edged the clouds with a touch of Broken China & Pumice Stone. I adhered one cloud flat to the blue notecard (also Hero Arts) and the smaller cloud on some dimensional tape, as you can see here.
I then cut a little circle from some yellow paper for the sun and attached it to the card, peeking out from behind the cloud.

Next I stamped the tree branches from the HA Kiss from the Sun Clear stamp set, using Memento Tuxedo Black ink and coloured in with Walnut Stain DI (and my Inking applicator from Ranger).

I stamped the HA Hello Flags (still one of my faves) using Memento Tuxedo Black again and then distress inked them with Mustard Seed and Peeled Paint. I then cut the flags out and laid them on the card to position them correctly before adhering them down with dimensional tape.
I added some twine from PTI to the branches (this took a LONG time to get the length right :)) and glued the twine behind the banners so it looked as though they were attached.

The "celebrate" sentiment is from HA Birthday Sayings Clear set and stamped in Mustard Seed Distress Ink.

Inside the card I've stamped "they say it's your birthday" in the same colour ink (Australia day is considered a bit of a birthday).

Uber simple and very much inspired by my lovely friend Joy's card, so I hope you like it! (But I know you'll LOVE Joy's one :))

Pop straight over to her blog HERE (right after you leave a comment :))

A big thank you to Joy for joining me on this fun challenge, I know how busy you are Joy, it means a lot to me that you found the time :)

If you have any questions about how something was done, as always, please let me know and I'll do a tutorial for you!

Thanks for looking!

Happy Australia Day friends

Linda xx