LINDA TRACE DESIGNS

crafty adventures of a makeup loving Japanophile!

.

.

Friday, 19 November 2010

Christmas cards to inspire Day 3: Distress Resist

Hello again my dears!!

How are you all today? I'm DYING of heat exhaustion here in Perth today.  We're not even out of Spring yet and it was 36 degrees Centigrade here today. (That's 96.8 F) I was quite a bit like the Wicked Witch of the West this afternoon when I went out the front to get the mail...I'M MELTIIIIIIIIIIIIING *wink* (but without the socks and green skin haha!)

So anyhoo--welcome to Day three of my Christmas Card Inspiration Week!  Let's get straight to the card--I'm pretty happy with this one :).

The techniques I used on this one are Heat embossing and a technique called "Resist".


Here's how I did it:
  • I cut a piece of Bazzill Kraft Classic Cardstock down to 5 1/2" long by 3" high. 
  • Then I took my Versamark watermark inkpad and applied it to my Hero Arts Wreath of Leaves Stamp (I LOOOOOVE this image!)
  • I then stamped multiple times over the surface, going off the edge quite a bit on all of the images to give extra effect (I re-inked my stamp with Versamark each time).
  • I shook some Mustard colored embossing powder over the whole image and blew off the excess then I heat set it with my heat tool.
  • Taking my Ranger Inkssentials Blending tool, I then added a light layer of Peeled Paint Distress Ink and Walnut Stain Distress Ink to the cardstock, blending it in well.  
The embossing will resist the distress ink you put over the top. Just make sure you wipe over your embossed areas to remove any excess distress ink that might be there and to really make your embossing powder's color shine through. (this is the technique called "Resist). 
  • I lightly distressed the edges of the cardstock with my scissors (or you could use a Tim Holtz tonic distressing tool) and added some Black Soot Distress Ink to the edges, to sharpen up the colors.
  • Next I added some Red Hero Arts Ribbon, a little twine and a couple of buttons from my stash.
  • Then I stamped the 'Merry Christmas' sentiment from the Hero Arts Merry Christmas Trees Clear stamp set and in Versamark and used red embossing powder on that before heat setting it.
  • I attached my inked, embossed and 'ribboned' cardstock onto a folded card that I'd made out of kraft cardstock (which I cut to size and scored in half).
  • On the inside of the card, I used the 'Best wishes for the season' sentiment from the same Hero Arts Merry Christmas Trees Clear Stamp set in Walnut Stain Distress Ink.

I'm starting to really utilise the insides of my cards now. I love adding a little something extra wherever I can.

Anyhoo, that's it! Super easy and it would really be easy to make multiples of these! I'd just stamp the Wreath image all over a bigger piece of cardstock and emboss it all, then cut it down to size! 

One more quick note--You can do the first few steps in the opposite order; the distress inks first and then add the embossing over the top.  This will only work when you are using colored embossing powder, but if you're using clear powder (so that the color of the cardstock underneath will show through), you must do the embossing first, then go over with your distress inks second.
(Because if the embossing powder is clear--and on top of distress inking- the distress inks will show through and you wont see your embossed image, it will just blend in with the distress inks colors.)

**A tip!!  If you do go the other way around (Distress ink first, then emboss over top), make sure the Distress Inks are completely dry before stamping the 'Versamarked' image (and most importantly, the embossing powder). If it's not dry, when you pour the embossing powder on, it will stick to the entire cardfront, not just the image you've stamped with the Versamark--very annoying...trust me *wink*
Have fun with this! It's a favourite technique of mine!

Talk to you tomorrow!

Linda xx

Thursday, 18 November 2010

Christmas cards to inspire Day 2


Hello!!

Welcome to day 2 of my Christmas Cards to Inspire week!

Yesterday I showed you the pretty effects if you use Distress Inks as Watercolor paints on standard Cardstock.
Today I want to show you the difference when you use watercolor paper, which has much more texture and thus, a better ability to tolerate more liquid.  It also leaves a pretty textured LOOK about the image, which I think is perfect for animals like...(you guessed it!! That cute little reindeer again) *wink*

Let's get straight to the card shall we?

This card has a really cute rustic feel about it, which I love. Sometimes I absolutely hate cards that--how can I put this the right way?!-- Take themselves too seriously.  Does that make sense?! I love cards that are pretty or cute or even whimsical--but no matter what, I love them to have a hand-made look, which this one does I think.

I used two techniques to create this one.

The first is using the watercolor paper with Distress Inks.  The second, is using my Acrylic Block to create that bluey-grey background.

To achieve this second technique (which was actually my first step), I dabbed some Tumbled Glass and Stormy Sky as well as Weathered Wood Distress Inks onto my acrylic block (Yes, I said ONTO the acrylic block---not the stamp).  Then I spritzed the acrylic block with a good 6 or 7 spritzes of water using my Ranger Mini Mister and then 'stamped' it onto Hero Arts Bright White Watercolor Paper .

I then cut my cardstock a 1/4" larger than the square of ink my acrylic block created (to leave a border of white). Then I edged my paper with Walnut Stain Distress Ink.

When the paper was dry, there was a really clear space in the color from the acrylic 'stamping', so I used that space to stamp my Hero Arts Fancy Reindeer in Black Stayzon Ink.
When the Reindeer image was dry, I used the same painting technique mentioned yesterday. I put the Frayed Burlap Distress Ink Pad upside down on my Ranger Inkssentials Craft Sheet to put the ink directly onto the craft mat, then spritzed with water.  Using a fine-tipped paintbrush, I painted the reindeer.  To give some shading, I waited for the ink to soak into the paper a little before putting a slight second 'coat' of ink down around the bottom of the reindeer's stomach and legs.
I used Fired Brick Distress Ink again for his scarf and nose (which I also popped a dot of Glossy Accents on).

Next I stamped the sentiment from Hero Arts Sprinkle Your Holidays with Black Stayz on Ink.

Then I adhered the watercolor paper 'layer' onto a  Hero Arts Cerulean (sky blue) notecard which I had trimmed down to size.  I edged the notecard in Walnut Stain Distress Ink after distressing the edges of the card.

Lastly I added some Hero Arts Small Accent Pearl (mine were white so I colored them with a Copic marker, but you can get some beautiful Light Blue ones that would be perfect)as well as some dots of Ranger Icicle Stickles to look like snowfall (and to add just a little bling *wink*).

I couldn't resisite popping a cute little blue and silver button from my stash in the corner, threading it with some red and white bakers twine for a final touch.

Hope you liked this one! I love the homey and textured look and feel of it!  I hope my explanation of the steps makes sense to you all, if you have any questions, PLEASE feel free to email me or leave a comment!


Please leave comments to let me know what you think!

See you tomorrow!

Linda xx

Wednesday, 17 November 2010

Christmas Cards to Inspire :)

Hello again dear friends!

This week I've got some super cute (if I may say so myself! *teehee*) Christmas cards for you!

These all took me only a few minutes each to make with a few simple techniques that can create a lovely effect.

Each day this week I'll be sharing with you some ways to use products like Distress Inks and stamps --that you might not have thought to try.

The first two (today's and tomorrow's cards) I used water coloring techniques but Distress Inks instead of Watercolour Paint.  The difference between painting on watercolor paper versus 'normal' paper is pretty surprising.  Watercolor paper has so much more texture and can allow much darker colors to be 'reached' (because you can put more ink/paint down due to the absorbent nature of the paper.)
Using water with distress inks is an excellent way to achieve a great look with your favourite Distress Ink colors.  Because Distress Inks are alcohol based, they don't 'lose' their color (or intensity) when mixed with water. 

Onto the card: today's card features my favorite little reindeer:
 This card is SO simple to make it's almost criminal :) Perfect for making multiples.

Here's what I did:
Using Black Stayz On ink, I stamped the Hero Arts Small Fancy Reindeer.
Next I 'stamped' some Frayed Burlap Distress Ink on my Ranger Craft Mat and spritzed with water using my Ranger Mini-Mister.
Taking a fine 'tipped' paint brush, I dipped the brush into the ink (swirled it around to make sure it blended with the water on the mat) and began painting my Reindeer image.
No special technique for the painting is required. 
Repeated steps 2 and 3 with Fired Brick Distress ink to color his nose and scarf --choose whichever ink colors appeal to you. (REMEMBER TO WASH YOUR BRUSH OUT BETWEEN COLORS!)
Using my 3" scalloped circle punch, I cut out the painted image. (The Scalloped Circle Nestabilities Die would work just as well)
I gently inked the edges with Antique Linen Distress Ink and a Ranger Inkssentials Blending Tool.
I put a TINY dab of Glossy Accents on his eyes and Ranger Diamond Stickles on his nose for extra sparkle and interest :) 
(I nearly painted his hooves, but then remembered Rudolf is a boy *wink*--my next Reindeer project will have to be a girl :) Pink or Red Hooves would be too cute! Teehee)
Using a 3 1/4" circle punch (Martha Stewart Circle cutter or Nestabilities Die would work perfectly too), cut out red cardstock.
Adhere the reindeer scalloped circle die-cut to the red circular die cut cardstock, using dimensional adhesive.
Take white cardstock, cut to size (mine is 4 1/8" wide x 4 1/8" high) round the corners with a Corner Chomper and stamp the "Merry Christmas" sentiment from 'Hero Arts Wishes Come True' Clear stamp set in red (I used Worn Lipstick as it worked better with my red cardstock and didn't blend in too much with the scarf-which I wanted to be the focus) and then again in Forest Moss Distress Ink.
 ** Try doing this last step with a smaller acrylic block if you can and have fun with it. Twist and turn your stamp around in all different directions. Leave spaces for the second color. Don't forget to stamp half off the page too, as this really makes a fun and easy (not to mention HAND MADE) background paper! The less neat and linear you make this part, the better the end result.**
I also edged my paper just lightly with Forest Moss Distress Ink using my Ranger Inkssentials Foam Blender tool, just to help make it stand out against the backing card.

Finally, cut some red cardstock to your desired size, score in the centre.
Adhere the circular cardstock onto your 'background paper', adhere that onto the front of your card! Round your edges with a We are Memory Keepers Corner Chomper and you're done!


**Note, if you are going to cut out the image you're painting, then feel free to paint like a toddler-- messy and quickly.  *wink* Don't worry about getting paint outside the lines, you'll be cutting the image out anyway, so you wont see the 'mess'.  If you are going to use the image and some/all of the white space around it (like I did here), you need to be a bit more neat.  
One option is to heat emboss the image first (use clear embossing powder if you've stamped in black already, or black embossing powder if you're only using Versamark ink) The heat embossing will give you a 'border' as such. Because heat embossing creates a raised area where the embossing powder has set, the 'paint' will stay in the lines more--especially if you only use a little at a time.

Hope you enjoyed this cute little reindeer card and try something like this for your Christmas cards! It's fast and easy, perfect for making enough cards for everyone!

See you tomorrow!

Linda x

Saturday, 13 November 2010

Giveaway!!

Hi everyone!! 

Just a quick post today--I have an exciting giveaway I'd like to share with you!!

My gorgeous friends at a2z have offered me TWO fantastic Hero Arts stamps to giveaway--thanks so much lovelies!!

Here they are:

CL459 Merry Christmas Trees

CG215 Wreath of leaves
These are two of my FAVOURITE Hero Arts Christmas stamps...

SO---all you have to do is become a follower for my blog! HOW EASY IS THAT?! If you're already a follower, then you'll already be counted in for the giveaway.

You have until Monday 22nd 9pm Perth time to get your name on the list!
**Perth, Western Australia is GMT +8--we are 13 hours ahead of Eastern Time Zone (currently)**

If I hit more than 30 in that time, I'll be sweetening the pot with some extra goodies--who knows HOW much fabulousness I can fit into the prize package?!

So go on!! Click the 'follow' button on the left, get your friends to do the same!

Good luck!

Linda xoxox

Wednesday, 10 November 2010

Banner for a little girl's room

Hi there!!


So sorry for the long time without anything new on here in our little piece of bloggy paradise! My eldest daughter who is 3, has been...well, let's say "being a challenge" these past few weeks and leaving me with absolutely NO time to do any crafting let alone time to write something to accompany such crafting!  Please forgive the lapse in time :)

I wanted to make something for Isabella's (my 3 year old) room.  I wanted it to be a bit more personal for her and pretty it up a bit (it used to be my nephew's room so it's a bit boy-ey with the blue walls :))

Plus, I'm crazy-mad in love with banners.

This is what I've been up to:

Here is Isabella's new banner :) 

This is how I did it:

First I took some material that we call Calico but in the USA, Europe etc I'm not sure, it's what you'd use to put a Christmas pudding (which you probably don't have in the US either!) in or similar.  (It's like a linen but not stiff)

I cut the calico into triangles with my pinking shears--2 layers of material per triangle for double thickness.

Next I stamped the triangles using Hero Arts Dots Cling Stamp,  Hero Arts Flourish Background Stamp, Hero Arts Stripes Pattern Cling Stamp and Hero Arts Large Artsy Circles Stamp using Papertrey Ink Inkpads in Pure Poppy and Hawaaiin Shores. I left a border around the outside to highlight the stamping. Then I sewed the triangles together) the 2 layers of each triangle. But it would be easier to use Glue Glider Pro Fabric Bond (I've used mine all up!)

Next I took some Ranger Studio Sticky Back Canvas and using my Westminster/Sizzix Big Shot Cutting Machine cut it out with a Spellbinders Classic Scallop Oval Large Nestabilities.  (It needed a tiny bit of extra cutting with scissors but if you ran it through your diecutter with an extra piece of cardstock or similar to make a 'shim', it would cut through clean.)
Next I layed the die-cut ovals out on my Ranger Inkssentials Craft Sheet and using repositional adhesive in my Glue Glider Pro, I stuck some letters on top (These were just old cheap chipboard letters that I've had lying around forever. If  I did this project again, I'd use paper/cardstock as the chipboard sat up a bit high and created a ridge.)
Next I painted around the letters to make a mask/negative of the letter using some Kaisercraft paint I had in my stash.
Then I used Tim Holtz Vintage Photo and Walnut stain distress ink around the edges to give it my usual vintagey look.  (Plus the edging makes the colour and letters stand out more)
see how there's a tiny smudge around the outside of the letter? Using thinner cardstock would prevent this (instead of chipboard)
Next step was to peel the back of the canvas and adhere onto the triangles (I used alternating colours, blue letter canvas on pink banner triangle)

 I felt as though it needed something, so I used a very slim paint brush and painted a thin line around the outside of the stamped area on the triangles (still leaving a plain border).  I also used my We are Memory Keepers Crop-a-dile and set eyelets in the top to thread through string/ribbon.

Here is the finished banner (In two photos so you can see closer up.)


Hope you like it!! I"m really happy with how it came out :) Isabella loves it too "Where did you get that mummy?!" was what she shrieked lol.  She knows the first letter ('I') is for her name so she's happy haha. Beyond that, she just thinks it's pretty!!  That's ok with me though!

Stay tuned because in the next few days I'll be posting a tutorial on how to use the Imaginisce I-top!! (One of my favourite tools!!)

Talk to you soon lovelies!!

Linda

Saturday, 6 November 2010

Name Banner for Isabella

Hi there!!

As a quick word of 'warning' (too strong a word but you get what I mean), this project will also be up on the a2z blog, (I'm not being lazy, I just am so happy with the results that I have to share it here too :))

I wanted to make something for my 3 year old Isabella's room.  I wanted it to be a bit more personal for her and pretty it up a bit (it used to be my nephew's room so it's a bit boy-ey with the blue walls :))

Plus, I'm crazy-mad in love with banners.

This is what I've been up to:

Here is Isabella's new banner :) 

This is how I did it:

First I took some material that we call Calico but in the USA, Europe etc I'm not sure, it's what you'd use to put a Christmas pudding in or similar.  (It's like a linen but not as stiff)

I cut the calico into triangles with my pinking shears--2 layers of material per triangle for double thickness.

Next I stamped the triangles using Hero Arts Dots, Fancy Flourishes, Stripes Cling stamp and Circles using Papertrey Ink Inkpads in Pure Poppy and Hawaaiin Shores. I left a border around the outside to highlight the stamping. 

Next I took some Claudine Helmuth Sticky Back Canvas and cut it out with a Spellbinders Nestabilities Scalloped Ovals die.  (It needed a tiny bit of extra cutting with scissors but if you ran it through your diecutter with an extra piece of cardstock or similar to make a 'shim', it would cut through clean.
Next I layed the die-cut ovals out on my Ranger Craft mat and using repositional adhesive, I stuck some letters on top (These were just old cheap chipboard letters that I've had lying around forever. If  I did this project again, I'd use paper/cardstock as the chipboard sat up a bit high and created a ridge.)
Next I painted around the letters to make a mask/negative of the letter.
Then I used Tim Holtz Vintage Photo and Walnut stain distress ink around the edges to give it my usual vintagey look.  (Plus the edging makes the colour and letters stand out more)
see how there's a tiny smudge around the outside of the letter? Using thinner cardstock would prevent this (instead of chipboard)
Next step was to peel the back of the canvas and adhere onto the triangles (I used alternating colours, blue letter canvas on pink banner triangle)

 I felt as though it needed something, so I used a very slim paint brush and painted a thin line around the outside of the stamped area on the triangles (still leaving a plain border).  I also used my crop-a-dile and set eyelets in the top to thread through string/ribbon.

Here is the finished banner (In two photos so you can see closer up.)


Hope you like it!! I"m really happy with how it came out :) Isabella loves it too "Where did you get that mummy?!" was what she shrieked lol.  She knows the first letter ('I') is for her name so she's happy haha. Beyond that, she just thinks it's pretty!!  That's ok with me though!

Talk to you soon lovelies!!

Linda

Sunday, 31 October 2010

Happy Halloween!

Hello sweet friends!!

Happy Halloween to you all!! I hope you enjoy the festivities and aren't frightened by too many ghouls and goblins showing up at your door--nor in your stomachs after all that Halloween Candy!

Halloween passed VERY uneventfully here as usual, but I'm a bit sad about the fact that we miss such a big season of tradition, fun and celebrations. Oh well. When my daughters get older we'll definitely have to bring Halloween into our yearly calendar :)

Despite that we didn't celebrate Halloween here, I've been feeling an itch to make a card for the 'season', so here it is:

Here's a little Halloween girl for you, I was going to make her a witches hat but she was just too cute, so rather than go "all-out" I kept it simple and just tried to give a feel of spooky darkness (it's much darker in life than this photo shows due to the camera flash).


Here's what I did:
  1. Stamp the girl image on white cardstock using Memento ink
  2. Stamp the same image onto Inkadinkadoo Masking Paper, cut out and (temporarily) adhere over original image.
  3. Cover a small rounded section of the base of white cardstock (to form the ground)--(I just cut a piece of scrap paper into the right shape as I didn't want to use the Masking paper, because this was particular size and shape for this card.)
  4. Ink up the Cloud Background stamp with Stormy Sky ink and stamp. (**NB The masking paper protects the little girl image and makes it look like she's standing in FRONT of the clouds)
  5. Ink the Silhouette Grass Stamp with Scattered Straw ink, stamp.
  6. Using my blending tool, add some Walnut stain ink to the base of the card to create the ground/dirt she is standing on.
  7. Remove the masking paper, color the girl image with copics
  8. Stamp Hello Flags stamps onto scrap paper in desired colors.
  9. Adhere flags onto cardfront and either draw a black line between to create the banner's "rope" (or cut a thin strip of cardstock and adhere to cardfront underneath pennants)
  10. Distress edge of card with scissors or distressing tool
  11. Mount onto Black cardstock!

DONE!! It looks like a lot of steps but they're all VERY easy.


Here's what I used:
Hero Arts Clouds Rubber Stamp
Hero Arts Silhouette Grass Stamp
Hero Arts Sweet Wonderful You Stamp 
Hero Arts Hello Flags Stamp 
Foam Blending Tool
Ranger Tim Holtz Distress Ink Pad Walnut Stain
Memento Tuxedo black ink
Ranger Tim Holtz Distress Ink Pad Stormy Sky
Ranger Tim Holtz Distress Ink Pad Pumice Stone
Ranger Tim Holtz Distress Ink Pad Clear For Embossing (on inside of card)
Ranger Tim Holtz Distress Ink Pad Scattered Straw
Ranger Tim Holtz Distress Ink Pad Weathered Wood
Copic Marker X-Press Blending Card
Copic Sketch Markers
Inkadinkado Stamping Mask Paper 12/Pkg 
Bazzill Cardstock Black OP 12 x 12 

Have a FRIGHTULLY wonderful Halloween dear friends!

Till next time--

Linda x

Thursday, 28 October 2010

Joy's final week *tear*

Hello Friends!

I'm back with the final (for now *wink*) creation from our dear friend Joy Taylor.  The four weeks that Joy has been guest blogging with us has gone by so quickly but we've loved every minute of it and of course, her gorgeous cards!  Joy, we will miss having your beautiful cards grace our blog every week, but we thank you so much for all the effort you've put into them and hope you come back to join us as guest blogger in the New Year.  *HUGS* to you.

Today's effort from Joy is nothing short of astonishingly beautiful--here they are:


are you all as blown away as I was?!

Take your time to ogle them--they deserve it :)

Here's the how to:

  • Take 6 or more tags, (you can buy either from your office supply store if you don't have the below die to cut your own. 
  • Ink over the top of the tags using Antique Linen.  
  • Once inked, take the Vintage Christmas stamps and stamp images over the tags using black ink.  
  • Next, using a different color distress ink for each tag, blend around the edges with the different colours, adding touches of Walnut Stain (to all of the tags) to give it a more vintage feel.  
  • Lastly, add twine and ribbon through the tops of the tags.

A very quick and fun way to produce tags to put on your Christmas presents or even add onto a card!

Here's what you'll need!


Crafty Secrets Vintage Christmas Stamp Set

Memento Tuxedo black ink
Ranger Tim Holtz Distress Ink Pad Antique linen
Ranger Tim Holtz Distress Ink Pad Barn Door
Ranger Tim Holtz Distress Ink Pad Walnut Stain
Ranger Tim Holtz Distress Ink Pad Peeled Paint
Ranger Tim Holtz Distress Ink Pad Broken China
Ranger Inkssentials Foam Blending Tool
Sizzix Tim Holtz Tag and Bookplates Die  and Copic Marker X-Press Blending Card (or Manila Shipping tags)
Twine
Ribbon


Now go get to it! I know  you'll be inspired to try your own, I was! (I'll post them in a day or two).

Have fun and don't forget to leave a comment!

Take care--
Linda

Tuesday, 26 October 2010

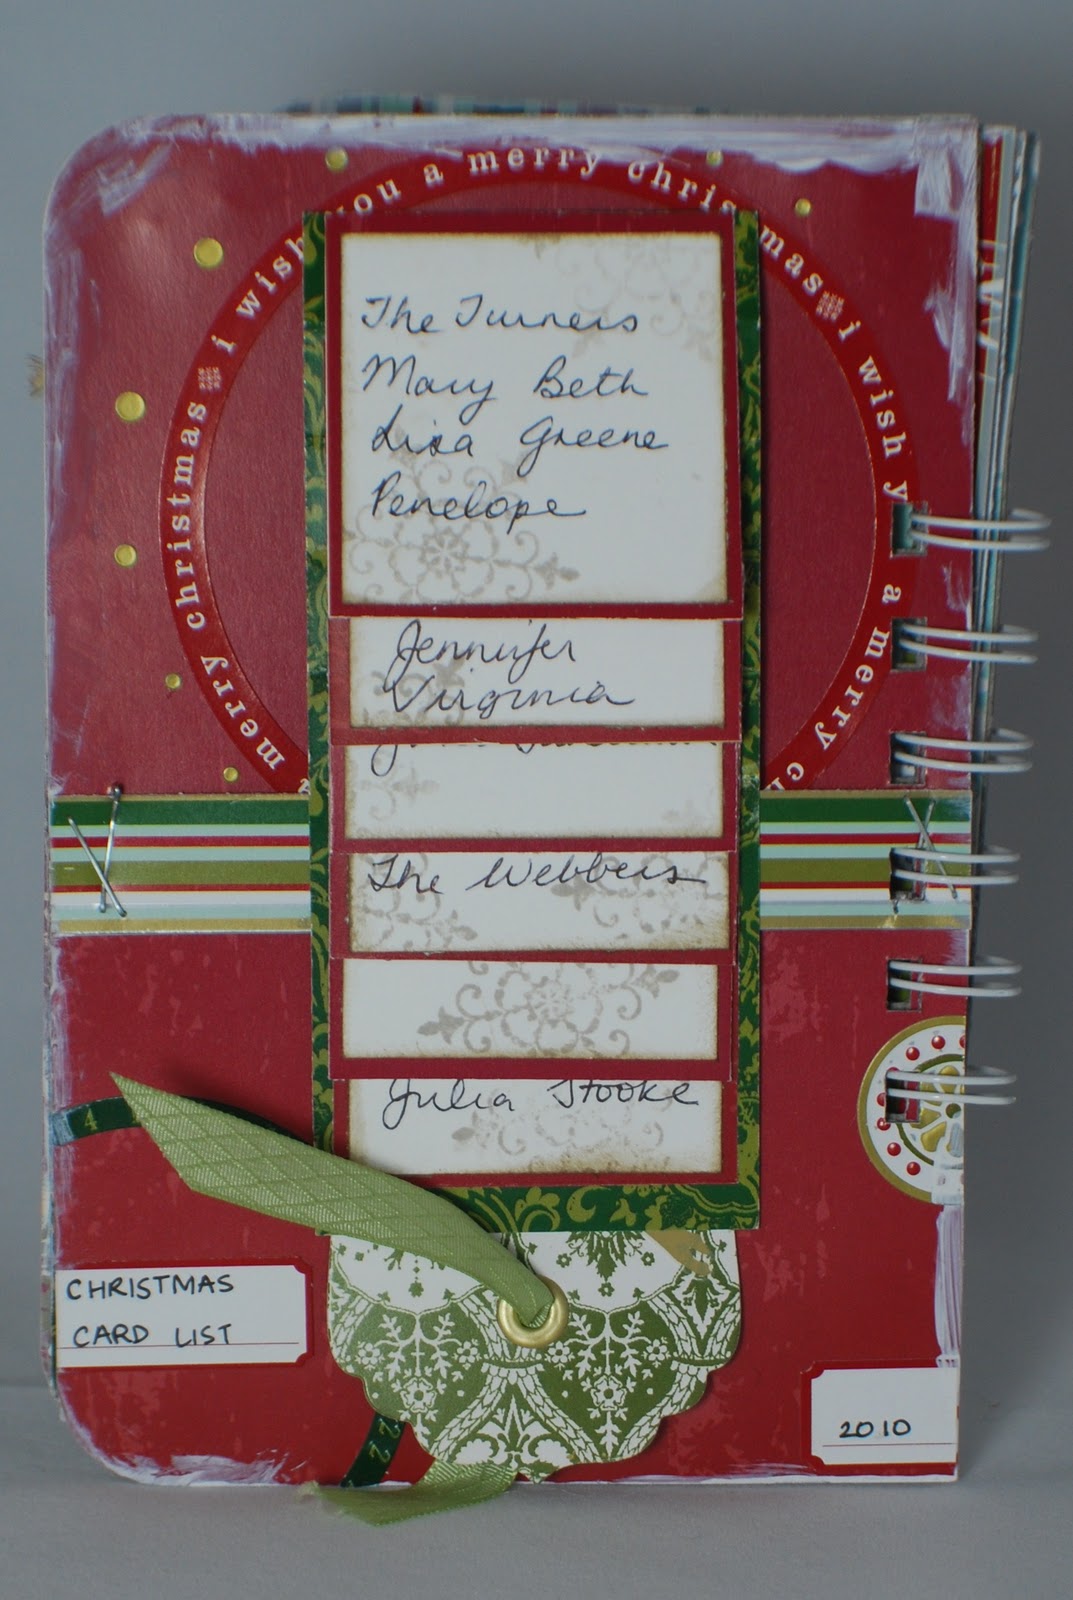
Christmas diary/to do book


Hello again sweet friends!!


There are only a few weeks left until Christmas (8 actually...*gasp*!!) so it's time to get organised and today I have a special Christmas album I made using gorgeous Christmas paper collection from Little Yellow Bicycle to help with that organising!

The paper colors and patterns are very traditional and muted--truly lovely.  I wanted to make something other than a traditional album to work with these very traditional papers, so I made a Christmas diary or to-do/reminder book for you to carry around with you during the Silly season.  At home, here in Australia we have Christmas in the heat so I'm sure our to do list might be slightly different but I'm in charge of the decorations, so I ALWAYS have a list of what I need to buy or make and what I need to do.

(Sorry about the photos, I was having real trouble with my photo editing software today, so apologies for the dark background!!)
So here it is:
here is the cover.   . 
The closure is a Tim Holtz Clear Charm fragment that's been stamped with Stayz on and a Hero Arts stamp then used Alcohol Inks to color the back of the fragment to make it look like a bauble.
The cover paper was cut with the EK Success Scalloped border punch.
this is a calendar page I downloaded off the Internet and cut with Labels 4 Spellbinders Nestabilities die.
Using the Hero Arts Ledger stamp I made a To Do list.
Christmas Card list with a twist! I made a 'waterfall card' effect.

excuse my hand but here you can see the pull down tab in action--it extends down about 3 inches and the small squares (with the writing on them) flip backwards--super cute!

Here is a little section for some Christmas cards and stamps to be put in--I always find when I'm out and about, that I run into someone who's Christmas card I've forgotten to write.  So I thought it would be helpful to have some extras stashed away in this diary so you could write a quick card on the spot if you need to.
This is a little section to keep old family recipes that you like to use each year.  I just printed some out on various forms of paper and cardstock and aged them to help them look like they'd been passed down by family members or friends.
And finally here is a little hand-made notepad.  I ALWAYS need a notepad! I simply printed out a 3 column word document with the lines on it, cut the pages to size and then using my crop-a-dile, cut holes and tied string to bind the pages together.  Using Pumice Stone Distress ink and the Hero Arts Wishes Come True clear set (also used to make the bauble on the front cover closure), I stamped the little snowflake randomly over the pages to give a Christmassy feel.  I backed the pages onto a heavy cardstock and threaded the backing cardstock behind a 'belt' made of cardstock, to keep it in the diary, but allow it to be removed when it runs out!

I also used a tonic perforating tool across the top of each page so you can tear them out as they're used.
Here's the back page--super simple and one-dimensional, which is the best thing for a back cover!

I simply then bound the whole album and edged the pages with a tiny smear of white paint to give a distressed look that didn't darken the overall coloring.

As a final note, all these pages are using Tim Holtz Grungepaper, so that the album is slightly flexible but sturdy--important for anything that is going into your handbag.  Everything used to make this album, apart from ink and the binding are from the Hero Arts Wishes Come True clear set and the Little Yellow Bicycle collection (which includes papers, rub-ons and stickers).

This really only took me a few hours to make in total, so you have plenty of time to order your papers now and get these made for yourself or even as a gift for a friend who likes to be organised (or maybe a friend who needs to be *wink*)

Hope you liked and as always, I'd love to hear what you think!

Linda xx

hello again

Hello!!!

Well I decided that yesterdays post was probably about as interesting as watching paint dry and by paint, I don't mean like Jennifer McGuire used on this weeks "Thinking Inking" series of videos on Twopeasinabucket.  I could literally curl up into an envious little ball and DIE that woman is so talented. pffffft her and her talentedness. LOL

ANyway, yesterdays post was also depressing so enough of that! I refuse to be kept down!! Viva la avocado!!! No wait...that's not right lol. Actually that was what some kids were graffiti'ing all over my high school when I was in year 11. I thought it was kind of hysterical in it's ridiculously inane commentary. Viva la avocado...teehee. still makes me giggle--even though I'm REALLY not pro-grafitti--in fact the total opposite.

ANyway, here are a couple of pics that make me happy:

Look at this pile of loot!!!!!!!!!!!!!!! Linda from a2z really jam-packed the box this time LOL.  I can't wait to get in there and play with it all.  I'll show you all what I make with it really soon.

Ok on to an ACTUAL CREATION!! *GASP*.  I know right?!
Here is a Wedding card I made for my mum who was going to a co-workers ceremony a few weeks ago.  The bride loves green so much her bridesmaid dresses were all wearing the colour, thus the choice of colour for the card.

 First I stamped the Old Letter Writing Definition background stamp on the cardstock using Peeled Paint Distress Ink and inked over it in Peeled Paint and Shabby Shutters Distress ink.
Next I stamped the Hero Arts Fabulous Flourish in Versamark and heat embossed it in white embossing powder.
Then I attached some olive coloured lace, thick white satin ribbon and matching olive coloured embroidery thread and made the bow. I attached a segment of an old bracelet that I had taken apart as a charm.
The sentiment is from Papertrey Ink and is stamped in Black Stayz on.
The bling are Prima e-line.
 the inside of the card was made using Pumice Stone Distress ink and the same Hero Arts Fabulous Flourish

This envelope is hand-made to fit the card inside without destroying the bow. Long story short, I measured, I fiddled, I cut, I measured more, I fiddled more, I cut more LOL. It took me a while, I wish I made a template!  Same Fabulous Flourish stamp with white embossing powder on the outside, but I also used the Tim Holtz On the edge Brackets die for the edge of the green cardstock as the envelope's "lip".

ANyhoo--that's it for me!! Hope you had a fabulous day and I'll talk to you all again soon!!

Lots of hugs
Linda xx

Monday, 25 October 2010

apologies

hello friends

this will be ANOTHER quick post filled with apologies from me.

I'm having one of those weeks months, where it feels like everything is wrong and too hard and too much so my creativity is pretty low.  I'm making things but I don't love any of them.  I'll still share them with you at some point but right now, I'd only be posting a picture with the caption "this is as good as I could get it" lol.  
Blogger is being a pain and changing all the formats for this and the a2z blog, which is taking me forever to work through, Charlotte stopped sleeping through the night and was waking every hour (which she's not done since she was born), Isabella is having a huge "episode" at every 10 minute interval and just is so rarely the little girl I'm used to having around, we all got sick for about a week.  
For those of you who don't know, I'm living with my parents at the moment.  I LOVE my parents to death and I so very hugely appreciate them allowing us to take over their home for a while, but I'm a very 'individual' (for lack of a better word) person. I like my space, I like my quiet, I like to do things when I can get them done and not be worried about rushing so I'm not annoying someone else, I like LOVE being alone.  Plus, I've not been happy living in this city for about 4.5 of the last 5 years I've been back.  LONG story short, despite my parents doing a wonderful job of sharing their house with us, I'm going more than a little mad.

I miss Japan.  Now, unlike most people, when I say I miss a place, I don't mean one specific thing, I don't mean, if I could go there for a holiday it would be better and I wouldn't miss it again for another however-many months/years.  Japan is inside me. It's a part of me.  It's where I first really found myself and FELT like myself.  (and that's saying something for a nearly 6 foot tall blondish-blue-eyed girl).  I miss it every day and on some days (like the recent ones), I've been so hungry for it that it's all I can do to stop myself from selling everything we own and buying a plane ticket.
I started a post last week to show you some photos of my beloved Japan but apparently clicking 'save now', doesn't translate into SAVE NOW to blogger (gah!) so here are a few photos for you:


This is the view of Kyoto city from the steps in front of the HUGE Kiyomizu temple. One of my favourite spots.

this is the Japan version of a takeaway restaurant. It had a vending machine you put your order through on! And the BEST ramen in the world!
this is in Kyoto

this is my beloved Osaka
and again Blogger is playing with my formatting-so apologies for these pictures being all over the place!

Anyway, that's enough whinging from me.  I'll try to pick myself up off the floor and get some good crafting done in the next few days and show you what I've made :)

thanks as always for being so patient my friends :)

Linda xoxo

Thursday, 21 October 2010

Joy Taylor Week 3!!

Hi everyone!!

We're back with another gorgeous card from our dear guest blogger Joy Taylor!

Here it is:


Beautiful isn't it?!

Here are the steps Joy took to make it--


Cut white card stock to form the card, using another piece of white card stock cut slightly smaller then the card front and using the Hero Arts, Branch and Flourish Tree inked with Versamark, stamp onto the white card stock and emboss with white embossing powder. 
Next, taking the Tumbled Glass Distress Ink and Foam Blending tool, cover the entire card stock by blending the ink over, making an emboss resist finish.  Once happy with the look, take the Hero Arts, Magical Background stamp inked with more Tumbled Glass and stamp directly over the image, giving it a tone on tone effect.
Add more Stormy Sky Distress Ink around the edges of the image, wipe excess ink off over the embossed area using a baby wipe to make it stand out more.
Add Liquid Pearls, Silver Pearl to the tree and leave to dry. 
Taking more white card stock, tear along one edge to form snow peaks, add touches of Stormy Sky to the torn edges and adhere under the embossed tree. 
Lastly, add a sentiment the bottom of the snow peaks, adding rhinestones either side of the sentiment and adhere the image to the front of the card using foam dimensionals.

This is a great way to use different techniques to create a fun card!

Here are the tools she used to create it:


Copic Marker X-Press Blending Card
Stampendous Stamp N Stuff Embossing Powder White Opaque
Hero Arts Magical Background Stamp
Hero Arts Branch and Flourish Tree
Hero Arts Sending Holiday Cheer Stamp
Memento Tuxedo black ink
Ranger Tim Holtz Distress Ink Pad Tumbled Glass
Inkssentials Foam Blending Tool
Tim Holtz Distress Ink Pad Stormy Sky
Ranger Silver Pearl Liquid Pearls Glue
Tsukineko Versamark Watermark Ink
Hero Arts Clear Gemstones
Glue Arts Mounting Adhesive Squares


Well did you love it as much as us?!

Till next time Dear Friends--
Take care and Happy Crafting!

Linda

Sunday, 17 October 2010

Have you seen this blog?

 Hi everyone!

Just a quickie today to ask if you've seen THIS blog--it's called the Daily marker and Kathy, who's blog it is--is a genius with Copic Markers--as in certified GENIUS!!!

She's doing a fantastic giveaway of all THIS:


 how fantastic is that?!  I'd love a chance to win it :)  Those Penny Black stamps are super cute!!

anyway, I've got an almost-three year old who's trying to kill me with her craziness this week, so I'd better go :)

Talk to you soon sweet friends!!

Linda xxx

Wednesday, 13 October 2010

Joy is back with a gorgeous card!

Hello dear friends!!

I'm back again with another gorgeous card from our lovely guest blogger Joy Taylor!  It's Christmas time in Joy's card, so let's get right to it!


This is how she  did it:
  • Stamp the holly onto white card stock and colour with Copics
  • Stamp the Magical Background stamp that is inked with Antique Linen over the top
  • Add Antique Linen to the sides of the card stock along with Vintage Photo. 
  • On the cream card stamp the Large Plaid Background stamp also inked with Antique Linen
  • Adhere the holly image to the card using foam dimensionals,
  • Dust lightly around the edge with more Antique Linen and a light touch of Black Soot. 
  • Lastly, add a sentiment to the bottom of the card using Sending Holiday Cheer, rhinestones either side of the sentiment and add some Glossy Accents to the berries.
Don't you just love it?! It's such a beautiful card and so easy to make!

Here are the tools Joy used:

Ranger Tim Holtz Distress Ink Pad Black soot
Ranger Tim Holtz Distress Ink Pad Antique linen
3L 3D Permanent Foam Squares
Bazzill Ivory Simply Smooth Cardstock
Copic Marker X-Press Blending Card
Copics - G09, G07, G05, G03, R39
Distress Ink  Vintage Photo
Glossy Accents
Hero Arts Classic Holly
Hero Arts Graph Background Stamp
Hero Arts Magical Background Stamp
Hero Arts Swirl Christmas
Memento Tuxedo black ink
Ranger Inkssentials Foam Blending Tool

Now it's time for you to make your own version! We hope you'll share with us what you make :)
Well, until next time friends--take care!

Linda